|
| Get some lovely color effects with freezer paper masks and glue gel resist. |
Welcome to my final Kitchen Resists tutorial. In this one we really "layer it on" using freezer paper masks and a resist made from blue school glue gel. If you can't find the blue glue gel- clear glue gel or white glue will also work. The fabrics I made in this project have many paint layers, but you can choose to apply fewer layers and still get some great results.
Don't forget to leave a comment at the end of this post or my posts from
January 3 or
January 10 in order to be eligible for my giveaway of a copy of my book,
Fabric Printing at Home: Quick and Easy Fabric Design Using Fresh Produce and Found Objects, plus one yard of Prepared for Dyeing cotton. I'll be choosing a winner on January 31.
Layer it On! Freezer Paper Masks and Blue Glue Gel Resist
You will need the following materials for this project:
To create the mask designs:
- Prepared for Dyeing cotton fabric (or pre-washed 100% cotton fabric). I used 12" x 15" pieces.
- Freezer paper (I use Reynold's).
- Craft knife with #11 blades.
- Self-healing cutting mat.
- Optional: Small sharp scissors.
- #2 pencil (optional).
- Iron and ironing board.
- Optional: Pressing cloth.
To create resist designs:
 A Detailer Writer is a small squeeze bottle with a precision tip. Use it if you want finer lines.
To paint over the designs:
A Detailer Writer is a small squeeze bottle with a precision tip. Use it if you want finer lines.
To paint over the designs:
- A flat work surface covered with
plastic. I like to make 15" x 20" Portable Work Surfaces with foam board covered with plastic film. Go here to learn how to make them.
- A 15" x 20" piece of cotton or muslin for each Portable Work Surface. This fabric will act as a blotter when painting over the resist-covered fabric.
- Masking tape.
- Transparent fabric paints (I like to use Pebeo Setacolor Transparent fabric paints).
Use colors straight out of the bottle or mix custom colors starting
with the lightest color and gradually adding darker colors. Dilute to
the consistency of light cream to help prevent breaching of (breaking
through) the resist (If you use Setacolor, it will be about a 1:1.5
ratio paint to water).
- Opaque fabric paints (I like to use Pebeo Setacolor Opaque fabric paints). Use colors straight out of the bottle or mix custom colors. Do not dilute.
- Plastic containers and spoons for mixing paints.
- Foam brushes to apply transparent paints.
- Foam daubers to apply opaque paints. Go here to learn how to make them.
- Dense foam brayers (I use Testrite) to apply opaque paints.
- Glass or Plexiglas palettes to roll out opaque paints.
- Wipe-up cloth.
To set and remove the resist:
- Iron and ironing board.
- (2) Pressing cloths.
- Plastic tub that fits in your kitchen sink.
- Liquid dishwashing soap.
Torn Freezer Paper Masks
To create the fabrics
in this project start by tearing strips of freezer paper. Iron the
strips onto the fabric with the plastic-coated side facing the fabric.
Strips can be ironed on horizontally, vertically or to create a grid
pattern. (Optional: Use a pressing cloth over the strips to protect the
ir
on)
 First Layer: Painting Over the Strips
Paint
the uncovered fabric between the freezer paper strips with alternating
colors to create beautiful backgrounds with interesting color mixing.
1. Mix up two colors of transparent fabric
using either the normal dilution (1 part paint to 2 parts water) or the
slightly thicker dilution (1 part paint to 1.5 parts water).
First Layer: Painting Over the Strips
Paint
the uncovered fabric between the freezer paper strips with alternating
colors to create beautiful backgrounds with interesting color mixing.
1. Mix up two colors of transparent fabric
using either the normal dilution (1 part paint to 2 parts water) or the
slightly thicker dilution (1 part paint to 1.5 parts water).
2. Use foam brushes to apply the paint. Alternate the two colors and
paint the fabric between strips. Paint up to and along the edge of the
torn freezer paper.

3. Let the paint dry completely before removing the freezer paper.
 Notice the beautiful color mixing created by this technique.
Second Layer: Drawing Blue Glue Gel Designs
Notice the beautiful color mixing created by this technique.
Second Layer: Drawing Blue Glue Gel Designs
Draw designs with blue school glue gel. When dry the glue acts as a resist when adding more paint layers.
1. Use blue school glue gel directly from the bottle or squeeze some
into a plastic Detailer Writer. Draw designs on the painted fabric.

2. Let the glue dry completely.
Additional Layers of Paint
After the blue glue gel dries use some of the following techniques to add paint layers over the resist.
1. Tear additional freezer paper strips and iron them onto the fabric
covering different parts of the fabric from the first round (I suggest using a pressing cloth to protect your iron).
 Tear additional freezer paper strips and iron them over the dried glue designs.
2. Or use a craft knife and self-healing cutting mat to cut out designs
from a sheet of freezer paper, then iron it to your glue-covered fabric.
3. Mix up additional colors of either transparent fabric paint (1:1.5 ratio paint to water) or opaque paint.
4. Tape a piece of cotton or muslin to your Portable Work Surface and then tape
your fabric with torn or cut freezer paper designs on top. The fabric underneath will act as a blotter, absorbing the excess transparent fabric paint, and preventing breaching of (breaking through) the resist.
 Tape a piece of muslin or cotton
underneath the glue-covered fabric to prevent additional layers of wet
paint from seeping under the resist.
Tape a piece of muslin or cotton
underneath the glue-covered fabric to prevent additional layers of wet
paint from seeping under the resist.
5. Use foam brushes to apply transparent fabric paint to the uncovered
areas. Paint up to the edges of the torn freezer paper masks as you did
with the first layer of paint. Optional: Use a wipe-up cloth to pick up excess
paint.

6. To apply opaque fabric paint over torn strips or craft knife-cut designs, use foam daubers to daub paint over the exposed fabric areas and along the edges of the freezer paper masks.

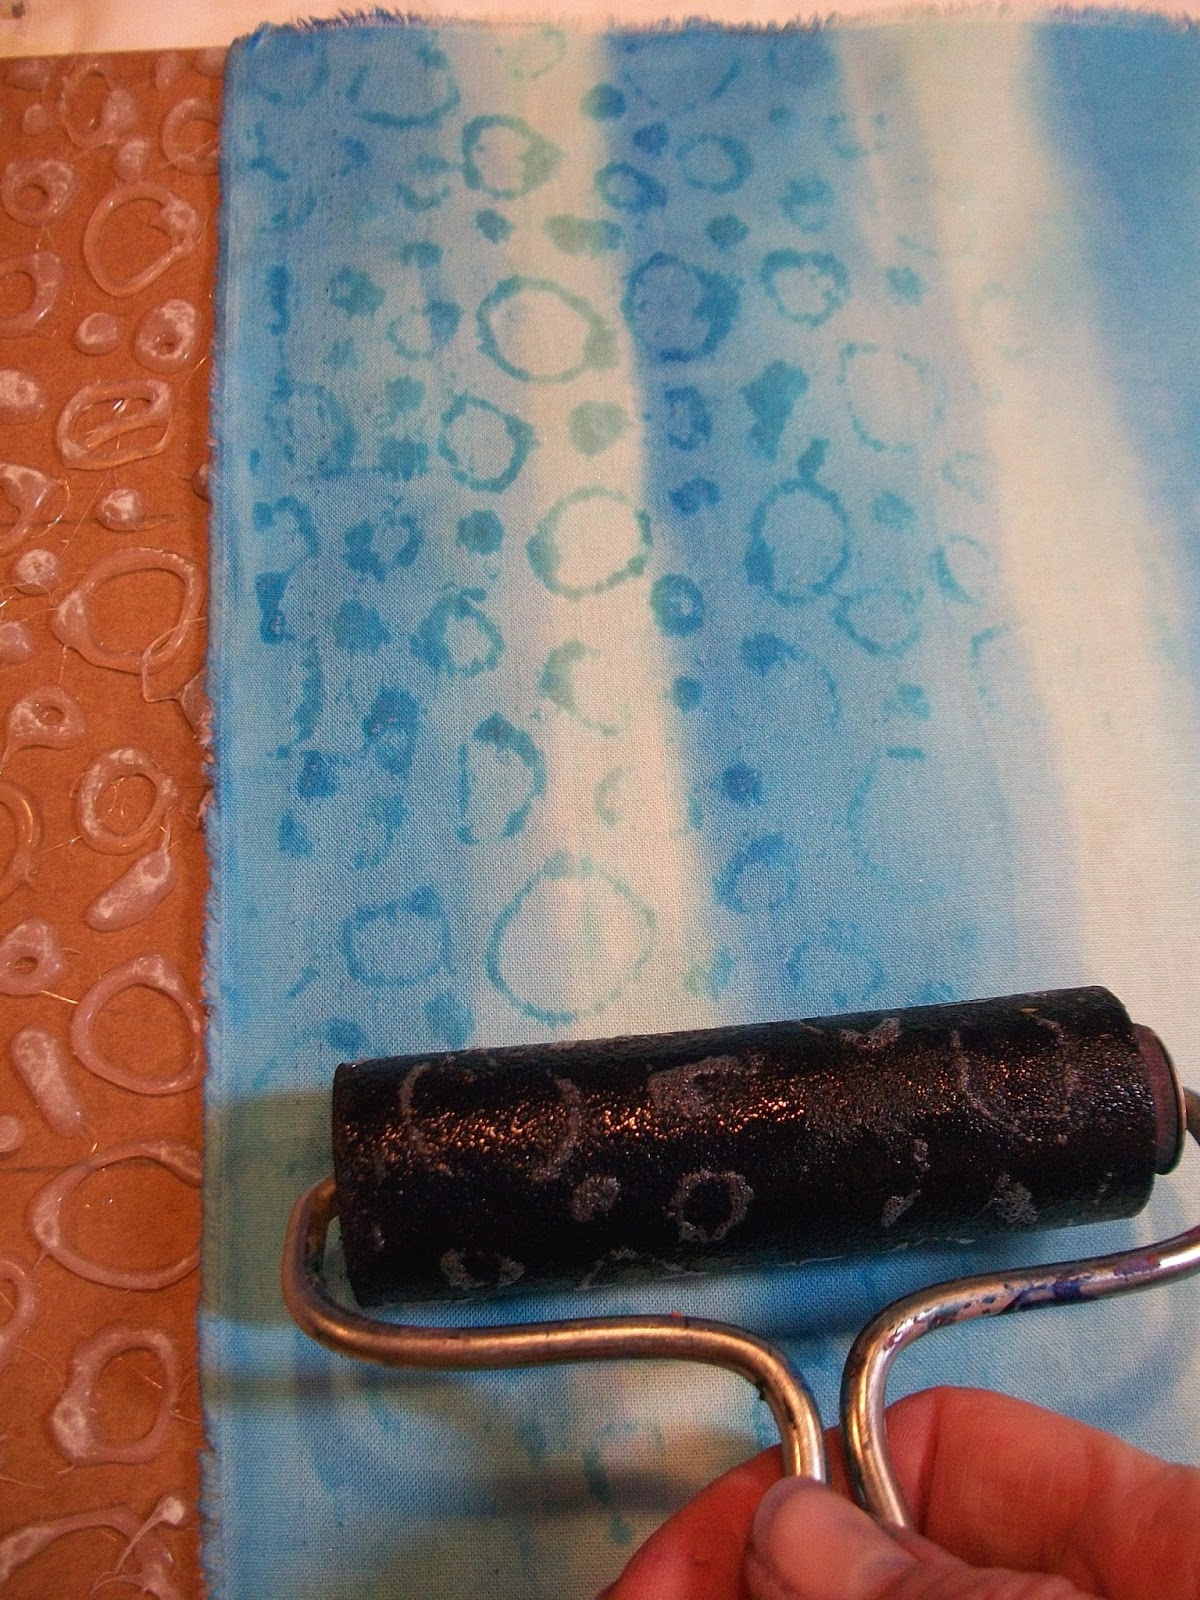
7. For a soft pastel texture roll over the freezer paper masks with a
paint-covered dense foam brayer. Spoon 1/4 teaspoon of opaque paint onto
the glass palette. Roll out the paint until the brayer is evenly
coated. Then roll over the freezer paper masks.

8. You can use one, two or all three of these paint application
techniques for different effects. See the finished fabrics below and
read the captions to see the sequence of paint layers.
Setting the Paint and Removing the Resist
1. See the instructions from my first blog post for setting the fabric paint.
2.
To remove the blue glue gel resist: Place the resist-covered fabric(s) in the
plastic tub. Add warm water and some liquid dishwashing soap.
Let the fabric(s) soak for at least 10 minutes to soften the glue. Rub to remove the resist or use a soft toothbrush. You will need to
occasionally dump and refill the tub with warm soapy water until all the resist is removed.
3.
I like to put the fabric through a delicate machine wash (warm or cold water
with some detergent), just to be sure that all the resist is removed.
4. Machine or air dry.
Below is a selection of fabrics created with these techniques.
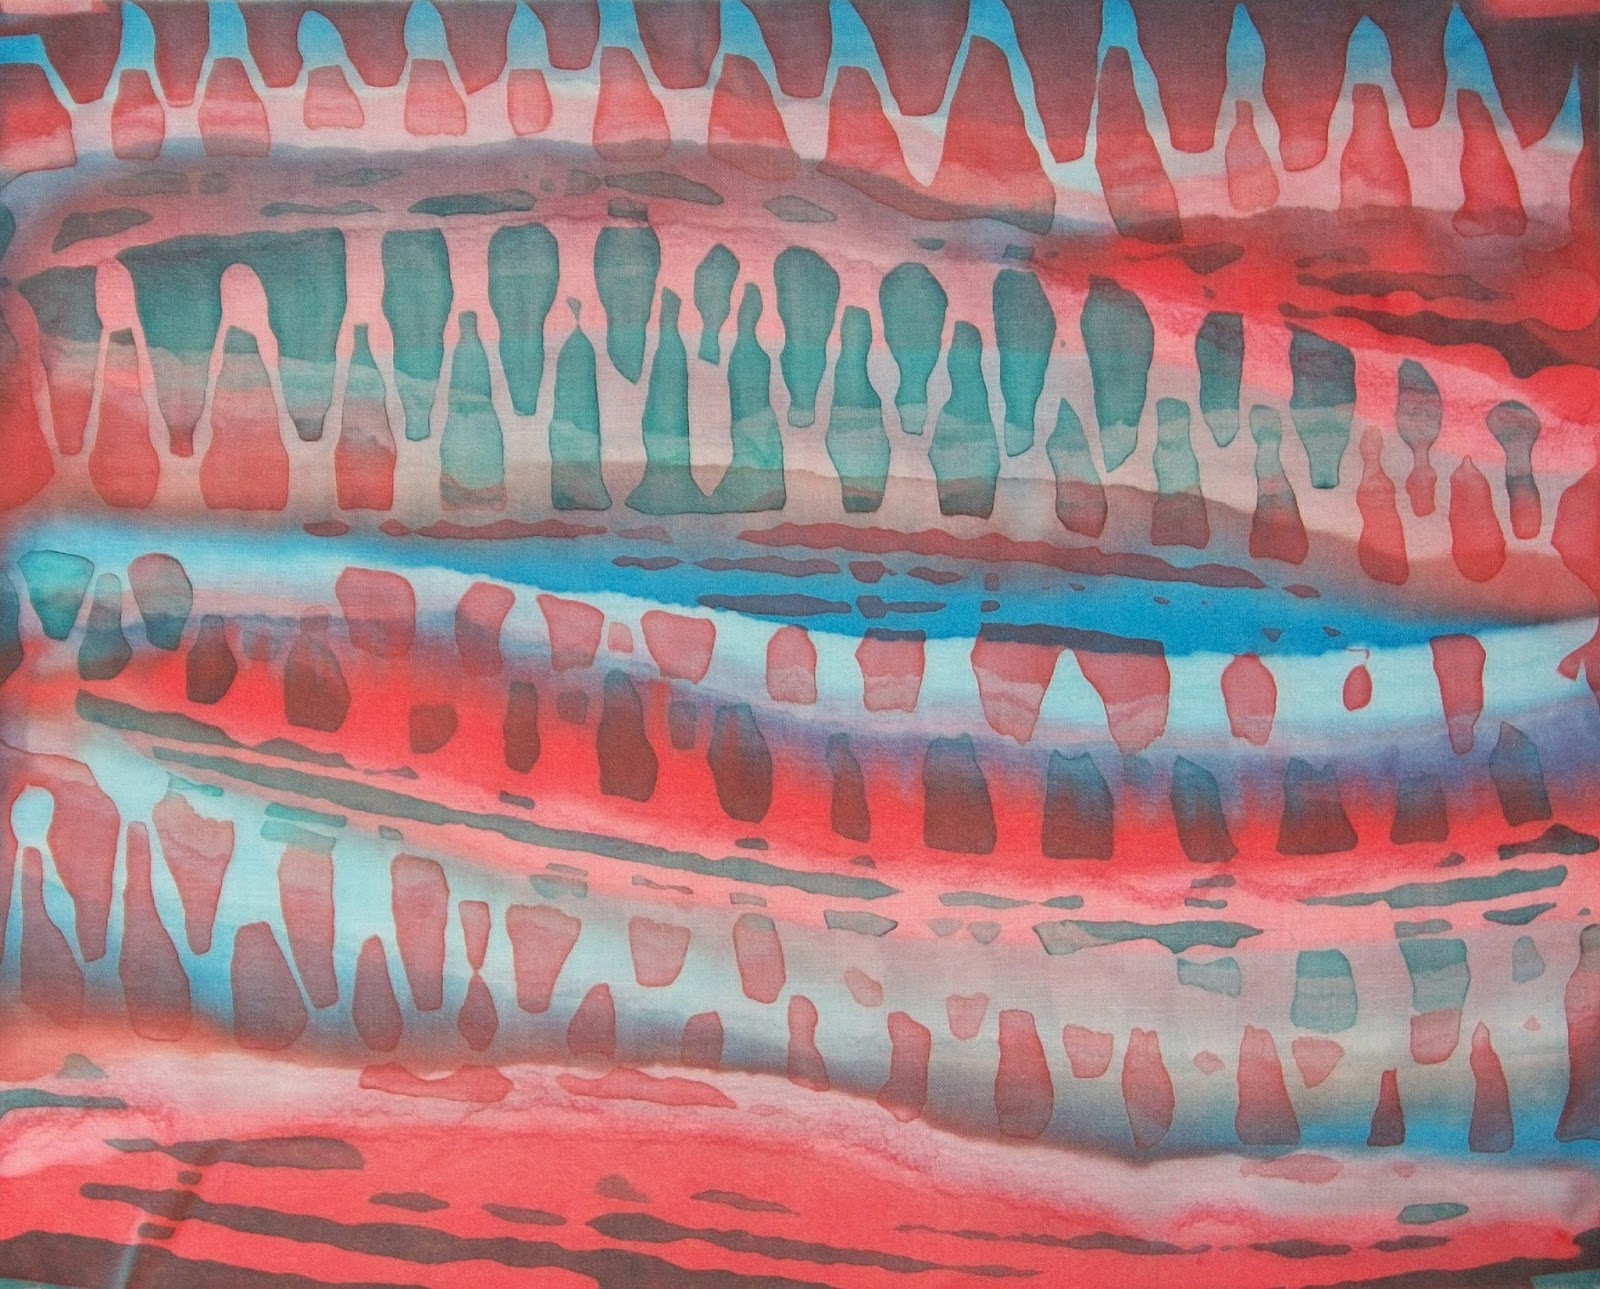
 1. Red and blue transparent fabric
paint applied over torn freezer paper strips. 2. Blue school glue gel
designs drawn on fabric with Detailer Writer. 3. Second layer of torn
freezer paper strips ironed to fabric exposing different areas. 4. Red and blue transparent fabric paint applied in opposite sequence to first application.
1. Red and blue transparent fabric
paint applied over torn freezer paper strips. 2. Blue school glue gel
designs drawn on fabric with Detailer Writer. 3. Second layer of torn
freezer paper strips ironed to fabric exposing different areas. 4. Red and blue transparent fabric paint applied in opposite sequence to first application.
 1. Yellow-green and blue transparent
fabric paint applied over torn freezer paper strips. 2. Blue school glue
gel designs drawn on fabric with a Detailer Writer. 3.Second layer of
torn freezer paper strips ironed to fabric to expose different areas. 4.
Rust brown and red transparent fabric paint applied to exposed areas.
5. Removed freezer paper
strips and ironed on a new layer of torn freezer paper strips to expose
different areas to paint. 6. Blue, light green and turquoise opaque fabric applied to exposed areas with a foam dauber.
1. Yellow-green and blue transparent
fabric paint applied over torn freezer paper strips. 2. Blue school glue
gel designs drawn on fabric with a Detailer Writer. 3.Second layer of
torn freezer paper strips ironed to fabric to expose different areas. 4.
Rust brown and red transparent fabric paint applied to exposed areas.
5. Removed freezer paper
strips and ironed on a new layer of torn freezer paper strips to expose
different areas to paint. 6. Blue, light green and turquoise opaque fabric applied to exposed areas with a foam dauber.
 1. Light
blue and blue-violet transparent fabric paint applied over torn freezer
paper strips (strips ironed onto fabric to form a grid design).2. Blue
school glue gel designs drawn on fabric with Detailer Writer. 3. Designs
cut out of a sheet of freezer paper using a craft knife. 4. Freezer
paper with cut designs ironed to fabric. 5. Turquoise paint applied to
open areas of freezer paper mask using a foam dauber. 6. Black paint
applied over open areas of freezer paper mask using a dense foam brayer.
7. Freezer paper mask removed and fabric painted with violet
transparent fabric paint.
Thank you for joining me for this first month of The Printed Fabric Bee's "reboot". I hope you've enjoyed learning about a variety of Kitchen Resists and will give them a try. For more projects like these sign up for my free online newsletter, Julie B Booth Surface Design News by going to my blog (sign up is in the right-hand column) OR pick up a copy of Fabric Printing at Home!
Remember to leave a comment for a chance to win. I'll be back to announce the giveaway winner on January 31. Good luck!
1. Light
blue and blue-violet transparent fabric paint applied over torn freezer
paper strips (strips ironed onto fabric to form a grid design).2. Blue
school glue gel designs drawn on fabric with Detailer Writer. 3. Designs
cut out of a sheet of freezer paper using a craft knife. 4. Freezer
paper with cut designs ironed to fabric. 5. Turquoise paint applied to
open areas of freezer paper mask using a foam dauber. 6. Black paint
applied over open areas of freezer paper mask using a dense foam brayer.
7. Freezer paper mask removed and fabric painted with violet
transparent fabric paint.
Thank you for joining me for this first month of The Printed Fabric Bee's "reboot". I hope you've enjoyed learning about a variety of Kitchen Resists and will give them a try. For more projects like these sign up for my free online newsletter, Julie B Booth Surface Design News by going to my blog (sign up is in the right-hand column) OR pick up a copy of Fabric Printing at Home!
Remember to leave a comment for a chance to win. I'll be back to announce the giveaway winner on January 31. Good luck!