It's just wonderful. I love Shibori...the process, the results...and have vowed to do more. Thanks for the inspiration.
Linda, I'll be in touch about getting your pillow to you.
I'd like to thank all of you for your comments, compliments and for sharing my blog posts on Facebook. I've enjoyed the opportunity to share some of my love of shibori with you. Now go pick up that needle and give it a try!
Candace Edgerley here with my last post on hand stitched shibori techniques. My final post will be the announcement tomorrow, August 31, 2016, from the random drawing of those who have left comments at the end of my blog posts. The lucky person will receive one of my silk shibori pillows.
The technique I'm introducing in this post is the Japanese Pine Larch - Karamatsu stitch.
Japanese Larch - Karamatsu shibori, linen, MX Procion dye
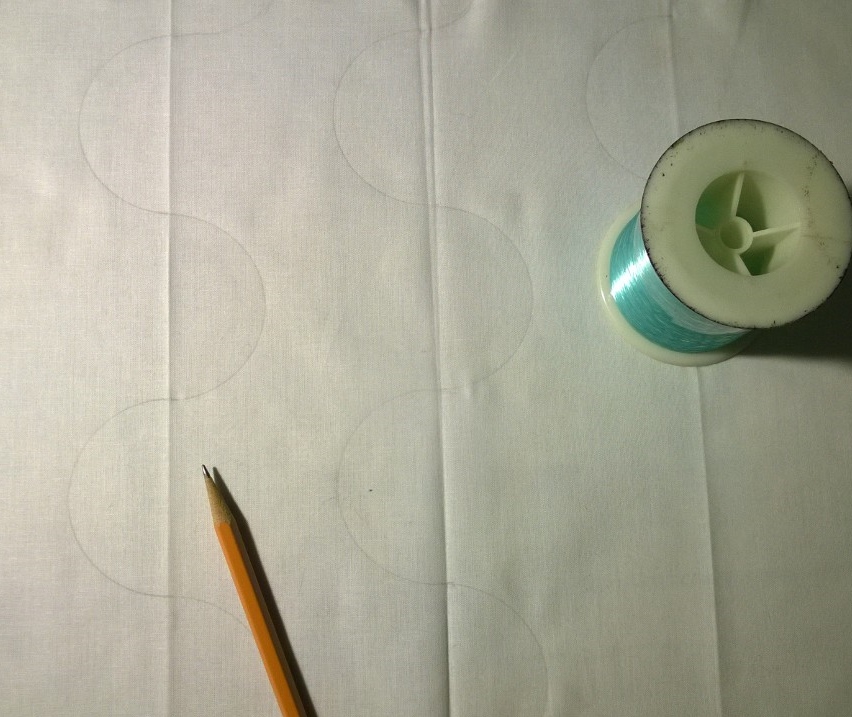
Stitched on the fold, half concentric circles are marked on the fabric, stitched through the two layers of fabric with a running stitch and the threads are drawn up tightly. The distance between the marked circles and the size of the stitch will vary the results.
The concentric circles can be spaced evenly or randomly depending on the results you are looking for. A light pencil line or a disappearing marker can be used to mark the lines for stitching. Making half circle template pieces from a sturdy cardboard (maybe from a file folder) can come in handy when marking more than one circle across a width of fabric. Be sure you line up the center of each half circle as you lay it on the fold. Or, you might want to dig out your grade school protractor with a pencil attached.
On the fold of the fabric above, I have marked the circles for stitching with a dotted line. I was recently asked to teach a short workshop where time was an issue and wanted to pre-mark the fabric for the students. Having just taken a class in using a laser cutter at our local Techshop, I was able to design my template in Adobe Illustrator and cut a Mylar stencil for marking a row of three concentric circles. I brushed the fugitive dye I purchased on a trip to Japan across the stencil to mark the napkins used for the class.
Section of the laser cut Mylar stencil used to mark fabric.
If more than one circle is stitched in a row, the threads can be carried across from one circle to the next. I recommend stitching the largest circle first which helps to stabilize the fabric for additional rows. The circles can be in staggered rows.
When the threads are drawn up, in the case of these three circles, they form a triangle shaped bundle. After pulling up the threads, inch across them with your finger nails to further tighten the rows. Spray with water to swell the fabric and threads which will make it easier to pull up the threads even tighter and tie off with knots.
Before dyeing the piece, soak in plain water for 30 to 60 minutes and follow the directions for dyeing the piece. After removing from the dye, rinse the excess dye from the fabric in cool water before putting it into the washing machine. All work should be washed in hot water following the dye bath. I recommend using synthrapol in the wash out.
The Japanese Larch - Karamatsu shibori, cotton napkin, MX Procion dye
I still find it amazing that the knots in each row of stitching create such a perfect resist. See the small dots in the right side of the right hand circle above.
Japanese Larch - Karamatsu shibori, cotton, MX Procion dye
I haven't mentioned the dye process in this blog hoping that, if you aren't already a dyer, you might be inspired to give it a try. Whether you are an experienced dyer or just starting, please do follow safety measures when handling the dye. Most companies that sell dye provide information about safety measures on their websites as well as downloadable copies of the MSDS (Material Safety Data Sheets) sheets. I use ProChemical & Dye's Studio Safety Guidelines as one of my class handouts.
Before I leave the blog, I'd like to share with you some of my shibori resources. There are many very good shibori books available, but the most comprehensive book I own is co-authored by Yoshiko Wada, Shibori: The Inventive Art of Japanese Shaped Resist Dyeing. Other resources on Yoshiko's website include the World Shibori Network, Slow Fiber Studios, and lots of books, etc in her Online Shop. You will find me in Oaxaca Mexico in November with Yoshiko attending the 10th World Shibori Network Symposium. I've attended previous Symposiums in Santiago, Chili; Paris, France; and Hangzhou, China. Yoshiko's Slow Fiber Studios educational textile tours have taken me to Japan and India.
Ana Lisa Hedstrom has a very good series of shibori technique DVD's. The series covers Stitch Resist Reconsidered, Arashi Shibori (pole wrapped), and Itajime Shibori (clamped). The series is well worth the investment.
So, I hope you have gained an appreciation for shibori and will give it a try. The magic caught up between the folds always presents the most interesting results. And remember, it doesn't need to be just blue and white. Try some color as well!
One more chance to be in the drawing for one of my silk hand dyed shibori pillows which will take place tomorrow. Just make a comment below to be included in the drawing.
Candace Edgerley here with another shibori stitch resist dye technique as well as a few tips to share and some experiments with last post's mokume. Don't forget to make a comment at the bottom of this blog to be eligible for the random drawing next week for one of my hand dyed shibori pillows. See an example at the end of this post. Ori-nui shibori is created on the fold of the fabric.Traditionally, ori-nui is stitched on an undulating line. A simple running stitch is sewn close to the edge of the fold. Once all the lines have been stitched, all the threads are drawn up, the piece is lightly sprayed with water, an additional tug to tighten up the stitching, and the ends are either knotted with the ends of the two threads or knotted with the adjacent row.
If stitching the undulating lines, you may want to mark the fabric lightly with a pencil line as a guide or use a vanishing fabric marker.
As you can see in the blue and white piece pictured, I've created random straight lines to stitch. You can either crease the lines with your thumbnail or take the fabric to the ironing board and crease lines with the iron.
Here I've creased the fabric and stitched close to the fold making sure I haven't stitched into the threads as I cross over previous stitched lines.
Silk dyed with navy ProChem washfast acid dye.
In this piece I've started with ori-nui stitched random lines and then stitched a second row stitches making a bolder line of stitching.
Cotton dyed with deep navy Procion MX dye.
Above you can see the difference in color between the two sample pieces; silk dyed with navy ProChem washfast acid dye and cotton dyed with deep navy Procion MX dye.
Dye-Na-Flow on wet & dry cotton.
I did a little experimenting last week with some of my mokume stitched pieces and two types of fabric paint. The first was Jacquard's Dye-Na-Flow. Working with narrow strips of cotton 5" x 12", I folded the bottom up 4" so that I could see the difference between stitching through two layers and just one layer of fabric as you can see at the top sections of the two pieces. The piece on the left was pre-soaked in water and the Dye-Na-Flow was painted on rather heavily. You can see how the paint did soak into the creases somewhat. Though I'm not exactly sure why, it could be that the pigments in this paint are smaller than the dye particles found in a true dye. The piece on the right was painted on dry fabric. The results were rather blotchy. Not sure if I'd consider either method a success.
Cotton painted with Speedball Fabric Screenprinting Ink
I liked the results of the Speedball Fabric Screenprinting Ink best. It was lightly painted on the top of the pleats, dry fabric.
Above you can see the difference between stitching through two layers of fabric (piece on the left) and stitching through one layer of fabric (piece on the right). Even though the rows of stitching are approximately the same distance apart on each piece of PFD cotton fabric, the resulting pattern varies. Stitching through two layers results in a bolder pattern as the two layers are bulkier to stitch through. The pattern created by stitching through one layer is finer, more delicate. They both have interesting qualities. I always find it amazing that just a tiny knot can produce such a defined resist.
Cotton dyed with deep navy MX Procion stitched through two layers, mokume.
The piece above was stitched through two layers. The dark areas that divide the piece were created by skipping across the fabric while stitching the rows. See image below. The half on the left was the top layer and the half on the right the "back" side. The rectangles on the right were caught up more in the gathers than those on the left side. I might have had better luck if I had marked my fabric before stitching. My lines of stitching the row of "rectangles" aren't very straight. Maybe that was my intention:)
Below is another piece where I've randomly skipped areas while stitching mokume resulting in scattered dark areas.
Tips and Reminders: 1. After stitching and drawing up all the threads, lightly spray the fabric with water to swell the fabric and thread making it easier to pull up the threads a bit more and tie the knots. 2. Soak the piece in warm water 30 minutes to an hour before dyeing to get a better resist. 3. I measure the amount of thread needed for a row and cut several pieces ahead of time. 4. Some who hand stitch like to have a pin cushion with needles pre-threaded and ready for the next row. I prefer to use the same needle which I don't cut off until I have the next piece of thread in my hand. If I cut it off before I'm ready to thread it again, I can never remember where I've put it. 5. I keep a small "Go Bag" with my necessary supplies for stitching to take along when I know I'll be waiting in a doctor's office, a passenger in rush hour traffic, or catching up with a relative on a speaker phone call. Nothing wrong with multi-tasking in these situations. Right?
Japanese Larch stitched shibori.
So, one more post coming with one more shibori resist stitch technique. This one is called the Japanese Larch. Hope you will join me next week on the 30th. I'll be announcing the winner of one of my shibori pillows on August 31st. Just make a comment below to be included in the drawing.
Candace Edgerley here, one of the new members of The Printed Fabric Bee. As I’m sure many of you can relate, I have varied fiber technique interests to include dyeing, block printing, screen printing, felting, knitting, and garment construction. The traditional Japanese resist dye technique of shibori is my favorite. Surface pattern is created between the folds by clamping, binding, pole wrapping and stitching. Recently I’ve been obsessed with various traditional stitched shibori patterns, working to make them my own. The patterns I plan to introduce in this and the next few blog posts all are created with a simple running stitch. Also an August giveaway will take place August 31. See details at the bottom of this post.
I find the hand stitching very relaxing and so portable--think riding as a passenger on a long car trip to the beach, binge watching your favorite TV series, or sitting in the waiting room at the doctor's office. Traditional Japanesestitch resist techniques are best suited for narrow strips of fabric as the Japanese created the patterns for kimono fabric which is between 13 1/2" and 14 1/2" wide. I've been working with strips of silk and cotton which are no more than 15" wide. Though it may mean threading more needles and tying more knots, it makes pulling up the gathers in the fabric much easier than across a wide expanse of fabric. Whether you are familiar with shibori, or are interested to give it a try, I plan to share some tips to help give you the results you want to achieve. This blog doesn't cover the dyeing process so I've been experimenting with various paints as well. If you are interested in using dye, I recommend Ann Johnston's book and/or video Color by Accident.
Hand stitched Mokume and Ori-nui shibori.
Tools:
The tools for preparing the fabric are simple and make this a very portable art. My favorites below:
Various needles (though any needle will work according to the weight of the fabric)
Light weight fabrics – Coats & Clark Plus, Hand Quilting, 32% cotton/68% polyester
Medium weight fabrics – Coats & Clark XP, Heavy, 100% polyester
Heavy weight fabrics – Coats & Clark Plus, Craft& Button, 74% polyester, 26% cotton
Fabric
Scissors with a sharp tip (Gingher 4” embroidery)
Seam ripper (Dritz)
Spray bottle for water
Small case to carry it all (mine is a sweet case from a dear friend--thanks Regina!)
Your choice of dye or paint appropriate for the type of fabric:
MX fiber reactive dye
Acid dye
Indigo
Dye-Na-Flow (actually a waterbased acrylic paint)
Other acrylic fabric paints such as Jacquard Textile Color, Pebeo Setacolor Opaque, Pro Chemical & Dye Profab Textile Paint, Speedball Fabric Screen Printing Ink
LETS GET STARTED
1. PREPARE THE FABRIC: If using dye, select the appropriate fabric for the type of dye you are using. With paints, most any type of fabric including polyesters can be used. I recommend experimenting. If the fabric is not PFD (prepared for dyeing), I recommend a prewash. 2. THREAD THE NEEDLE: Estimate the length of thread you will need to complete the row of stitching, add another three inches or so and double that amount.Thread your needle with the thread doubled. This helps prevent broken thread and provides two ends which often come in handy for tying a knot after stitching.
3. KNOT THE THREAD: Any large knot will do, but give a tailor's knot a try. So quick! Directions are for right handers. Substitute the word "left" for you lefties.
--Wet the two ends of thread.
--Pick up the needle with your right hand and lay the thread ends across your right index finger.
--Place your needle across the thread.
--With your opposite hand, wrap the thread around the needle three or more times depending on how big a knot you need so that it doesn't pull through the fabric as you tighten the threads when gathering.
--With your left index finger and thumb, lightly pinch over the thread wrapped needle.
--Push up the eye end of the needle up with your right hand and continue to pull the needle up through the wrapped thread, pull the knot to the end of the thread with your opposite index finger and thumb nail. You may need to straighten the knot a bit, but we aren't striving for pretty. Just a nice thick knot.
If I've completely confused you, check out my first YouTube video demo.
4. STITCH: Always do all the stitching first before drawing up the threads. Gathering the fabric before completing the stitching makes it impossible to keep track of where to stitch next. The three techniques I will be introducing all involve the running stitch. A simple in and out with the needle. I usually load three or more stitches on the needle before pulling the thread through the fabric.
5. GATHER:After doing all the stitching, pull up the threads using your fingernail to help inch the fabric along the length of threads. I'll be introducing three stitch resist shibori techniques. Directions for the first, Mokume, follow these steps.
6. SPRAY: After all the threads have been drawn up, use a spray bottle to lightly spray the fabric before tying off the threads. This water will swell up the fibers in the fabric and the thread making it possible to tighten the stitches even more and make it easier to tye off the knots. Do not wet the fabric before all the stitching is completed as it will be difficult to pull up the gathers once the fabric is wet.
7. TIE: You may choose to tie the two ends of the thread together to secure the thread at the end of a row or tie the threads from two rows together. I usually tie the threads from two rows together.
8. SOAK THE FABRIC: Soak your fabric in plain water for 30 minutes to an hour to saturate the folds. The water will help act as an additional resist and act as a "place holder." If you skip this step, the dye or paint will seep into the folds, wicking into the dry fabric and you will lose the sharp, crisp lines you are looking to create. If using MX dye and you usually pre-soak your fabric in soda ash, I recommend changing your steps and add the soda ash at the same time you add the dye. Hand stitching fabric that has been pre-soaked with soda ash can be harsh on your hands. If using paint, experiment on samples with both wet and dry fabric to see how paint reacts. you may find applying the paint to dry fabric a better choice.
9. DYE OR PAINT YOUR FABRIC:If using dye, you may use either immersion or low water immersion methods. When I immersion dye, I allow my pieces to stay in the dye pot a minimum of one hour. If using paint, try various ways to apply the paint - soak in thinned paint, brush on paint. Be sure to read the directions for setting the type of paint you are using.
10. REMOVING THE STITCHES/WASH OUT: If using dye, rinse the piece well to remove excess dye before attempting to remove stitches. It is best to allow the fabric to dry, at least partially, before clipping the threads with small sharp scissors or a seam ripper to release the folds. It is so easy to accidentally clip the fabric when it is still wet. I usually give an additional rinse before the final wash out with synthrapol. If using paint, follow manufacturer's directions for setting the paint. Then follow with a wash.
MOKUME (wood grain)
Mokume, MX dye on cotton
Using a simple running stitch, stitch parallel lines across the width of the fabric. Results will vary depending on the length of your stitches and the distance between the rows. All knots should be at one side of the fabric and the loose ends at the opposite side. You may or may not want to mark light pencil lines to follow when stitching. It is not necessary to line up stitches or be concerned about absolutely straight rows. I don't mark my fabric when stitching.
Once the fabric has all been stitched, gather up the stitches. After gathering, spray with water to swell the fibers which will make it easier to draw up the stitches even tighter and tie off the knots. You may choose to tie the two ends together or tie the ends of every two rows together. I prefer tying the ends of every two rows together depending on how far apart the rows might be.
To complete the piece, follow steps 8 through 10 above: Soak, Dye or paint, Remove stitches, Wash out. During a recent trip to India and seeing how many of the hand dyed fabrics were folded and stitched, I decided to try stitching two layers of fabric together. By stitching through two layers, I was able to stitch the same amount of fabric in half the time. See the piece below where I have folded one side in half and the other side on the diagonal. This is a great way to save time, but note that there will be a right and wrong side to pieces dyed this way. The inside of each fold will not receive as much dye as the outside.
So what's next? Next week I'll be posting a second stitch-resist shibori technique called Ori-nui. I'd love to hear back from you concerning questions and whether I've inspired you to start stitching. Those who make comments will be added to the pool for my August giveaway...a pillow similar to one of those pictured at the beginning of this post. Leave your comment by August 30 and I'll post the winner of a random drawing at the top of the blog on the 31st. Good luck and thanks for your interest in shibori.
Candace Edgerley with her hands in the pots.
If you live in the Washington, DC area and are interested in taking classes, check out the schedule at The Art League School in Old Town Alexandria, VA. I'm teaching several shibori workshops as well as a low water immersion dye workshop and a Design and Print Your Own Fabric workshop.


