Sunday, April 24, 2016

Ice Dyeing with Cleanline Resist and Giveaway

GIVEAWAY CLOSED - Congratulations Darcy Berg!

This is my last post for this month on ice dyeing with resists. Another resist that you can use with ice dyeing is Lumi Cleanline. I love using this product when painting on fabric. If you've never used Cleanline, check out my post about it here.

So I tried it with ice dyeing.

You follow the same procedure as when you are ice dyeing with soy wax or Color Magnet. Soda ash soak the fabric and hang to dry. The Cleanline resist is then applied to the dry fabric with whatever tools you like to use including, but not limited to, thermofax screens, wood printing blocks, or potato mashers. Then let the Cleanline dry before ice dyeing.

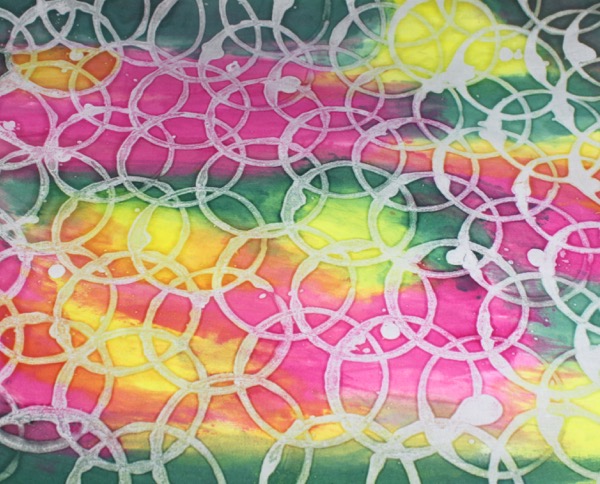
When completely dry, I scrunched the fabric up and ice dyed it.

Here are the results. With Lumi Cleanline resist, since it is water soluble, you don't get a strong resist due to all of the melted ice water that sits on it, but still gives a nice, almost muted, background.


These are just a few of the resists you can use with ice dyeing. I could see the kitchen resists and even glue working with this technique. If you try any others, I'd love to hear about your results.

As I mentioned in my first post this month that I am working on my online class - Icy Delights. Registration will open in May.


Because a lot of the dyes split or break out to their component colors in ice dyeing it's difficult to buy dyes not knowing how they will look. For my class I've ice dyed 34 different colors so class participants can see which colors they might like best for their projects. I've also included some of my favorite color combos.  But more about the class later.

Let's get to the giveaway.


For my giveaway the winner will receive 4 fat quarters of my favorite ice dyed fabric (and maybe a surprise). You must comment on this blog or my Bloombakecreate blog. The deadline is Friday, May 6 at 8 am CST. I'll be posting the winner at the top of this post.

Good Luck and thanks for reading my posts this month.


Tuesday, April 19, 2016

Ice Dyeing with Color Magnet

Oh, how I love Jacquard Color Magnet! Since I love ice dyeing and Color Magnet, I wanted to see how they would work together. Color Magnet isn't really a resist but a color attractant, but I still thought I'd put it in the resist category.


If you're not familiar with Color Magnet, I wrote several posts about it including this one. I received several questions after that post that I wrote a follow up Color Magnet Q & A post.

For the above fabrics I pulled the Color Magnet through my thermofax screen. After the Color Magnet dried, I ice dyed with Cerulean Blue (left)  and Brushed Steel (right). As you can see, the Color Magnet and ice dye worked great on Cerulean Blue, a "pure" dye. However, it didn't do so well with Brushed Steel due to the way the dye breaks out during the ice dyeing process.

So from my limited experience with combining CM and ice dyeing, I'd recommend just using "pure" dyes or those that don't "split." This was a scarf I did the same process on again with Cerulean Blue. The silver marks are Silver DeColorant.


Well, that's all for this week's post. I have one more post on resists with ice dyeing. Next week I'll post my giveaway too. Have you tried any resists with ice dyeing? I'd love to hear about your results.
 

Monday, April 11, 2016

Ice Dyeing with Soy Wax

As I mentioned in the first post, I've been ice dyeing since 2011 and have really loved the surprises from this fun dyeing technique. But as I've grown as an artist I've wanted to add even more texture. I love soy wax, so thought it would be fun to use it as a resist.


If you aren't familiar with soy wax or want a refresher, I wrote a blog that included all of the supplies needed. It also included two videos where I used soy wax on silk. Here is the link. If you'd just like to see the video, here it is.

https://youtu.be/K9mDvDuS-KA


Ice dyeing is a bit different with soy wax because the fabric must be dry. The first step is to soda ash soak the fabric. In regular ice dyeing, that wet fabric would then be put on the dyeing rack ready for the ice. However, since the soy wax will dissolve in water, the fabric must be dry before you start this process.

After the fabric has been soaked in the soda ash water for 30 minutes, remove and hang to dry.
Once it is dry, you can lightly iron the fabric if it is too wrinkled for you.

Now it's time to get the soy wax out. For this example I used a paint brush to make my marks. You can make marks with a variety of objects. I really like to use potato mashers.


Once the wax dries, which only takes a couple minutes, lightly scrunch it up and set on the rack inside of the dyeing pan.


Add the ice.


Then sprinkle on the dye.


And after a 24-hour batch, here is my fabric.


And another one.


And a couple more.


If you've not tried marrying ice dyeing with soy wax, I sure hope you'll try it.

Next week is about another resist we can use with ice dyeing. I'll also be talking about this month's giveaway. I hope to see you then.

Tuesday, April 5, 2016

Ice dyeing with resists

Hi, Lynda here. Oh, how I love ice dyeing. This month I'll be posting about adding resists to this fun technique. But first I'd like to give you a little history on ice dyeing.

Several ice dyed fat quarters


Back in 2010 I was writing a column for our newspaper about local artists. I had always been into arts and crafts, but never dyed anything until after I interviewed Karen, a fabric artist. As soon as I walked into her studio, I fell in love with her bolts and bolts of snow dyed fabrics. Winter was approaching, so I ran out to our local Blick's and bought several fiber reactive dyes, fabric, and other supplies. In January 2011, I snow dyed my first fabrics. I loved the results, but then the snow was gone. I remembered that Karen had made her snow with a snow machine when snow wasn't available. I thought instead of making snow with ice, why not just use ice cubes.  I googled ice dyeing and dyeing with ice, but couldn't find any information on it. I decided to go ahead and try it, and was so excited with my results. This is my very first ice-dyed piece, "Mayo's Garden." I mounted it on canvas and hung in my studio to remind me of what started me on this journey. 

Mayo's Garden hanging in my studio


After writing a blog post about my experiences, I queried Quilting Arts about writing an article about ice dyeing, and ended up writing the first article on the technique in the August/September 2011 issue. Since that time the technique has taken off and fabric artists all over are creating such lovely fabric. I definitely don't consider myself "queen" of ice dyeing, but think of myself as "mother" of it!

If you have never ice dyed, I taped a webinar in 2013 for Quilting Arts that is still available. You can see it here. You can see my very first tutorial on my blog here. I'm also working right now on Icy Delights, my online class all about this wonderful technique. I'll be talking more about the class later this month before it goes live.

So for this month, let's talk about resists. The first one is clothes pins. I absolutely LOVE using clothes pins whether I'm ice dyeing, low immersion dyeing, or in my easy and fast silk scarf dyeing classes where we use instant set dyes.

For this piece I used Cerulean Blue, Fuchsia, and Golden Yellow.


It looks difficult, but it's just fan folded and then clipped with clothes pins.


 I also did an experiment with this folding and clipping and using the same dyes, but didn't ice dye. I just put dye on the fabric without using ice and here is the result. It's pretty, but doesn't have the texture you get with ice.


Here is my thrift store shirt that I folded and clipped the same way.


I also dyed my hubby a shirt.


And a silk scarf.


This is just one type of resist. You could also use rubber bands or hemostats, to name a few. There are so many different ways to get more texture. Ice dyeing gives such beautiful results and adding resists just bumps up the beauty. See you next week for another resist I love to use with ice dyeing.