Showing posts with label giveaway. Show all posts

Wednesday, November 30, 2016

"Yo-Yo Flowers" Mini Prayer Flag - Part 2

Now that your flower is made, the next step is to make the flower centers!  The flower centers are made with LOTS of French Knots.  To do this you need to use a linen type fabric.  I like to work with a piece about 4" square.  Draw 3-4 circles using a pencil about the size of a nickel.  Leave at least 3/4" between each of the circles and the edge of the fabric also.  You can either start in the center or work from the outside edge into the center. Does not matter.  You just have the completely fill the circle.  It is best to use Size 5 or Size 3 Pearl Cotton Embroidery thread as it will fill the circle faster.  I use a Chenille #22 or #20 Needle.

Wrap the needle either 2-3 times depending on the size of the thread.

After all the French Knots are finished, using the same thread, make a running stitch around the outside edge of the knot center, about 1/8" - 1/4" outside the circle, then cut the circle out about 1/8" - 1/4" from the running stitch.  Do not cut the thread.

Pull the thread tight and push the raw edges down so they don't stick up so much.  
Do not cut the thread.
Stitch back and forth across the raw edges to push the raw edges down even more.  Knot at the end.  Do not cut the thread.
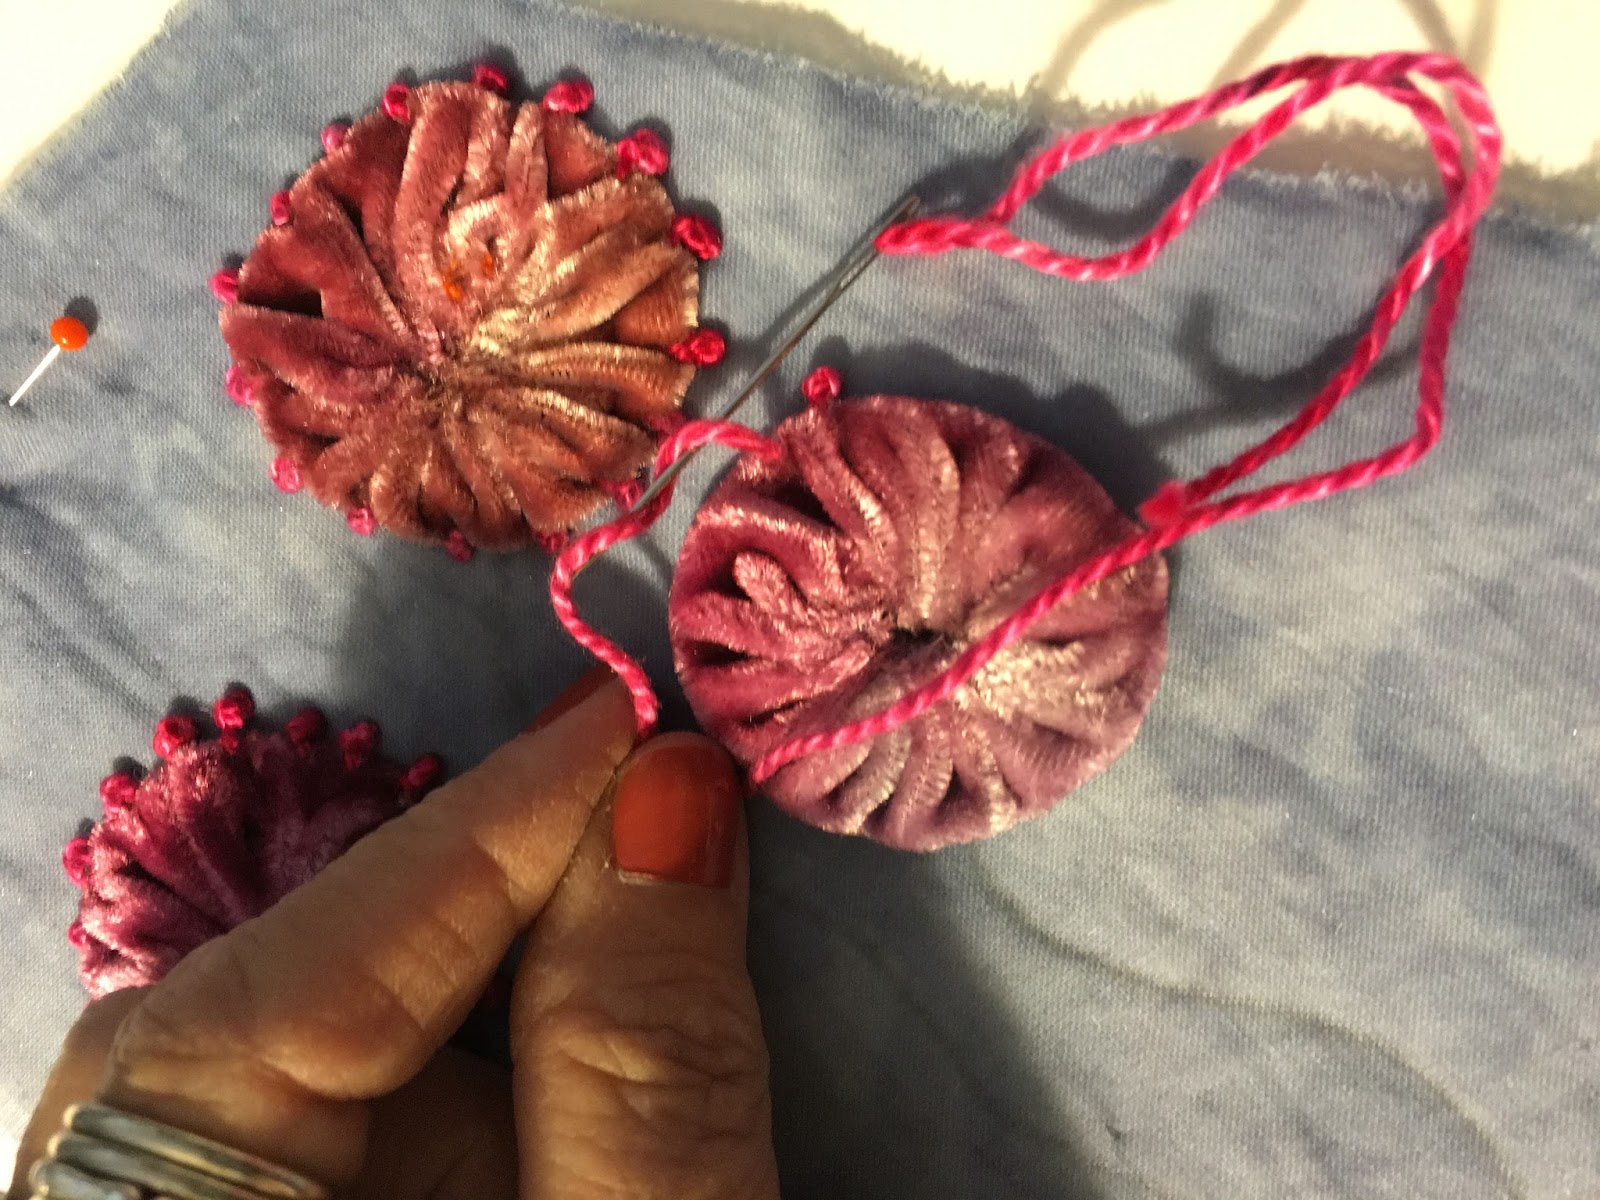
Using the same thread, stitch straight through into the velvet yo-yo.  Next come up into the edge of the French Knots, making sure you are in the linen fabric.  Take tacking stitches around the edge of the French Knot center to attach it to the Yo-Yo.  Knot on the back and NOW you can cut the thread!
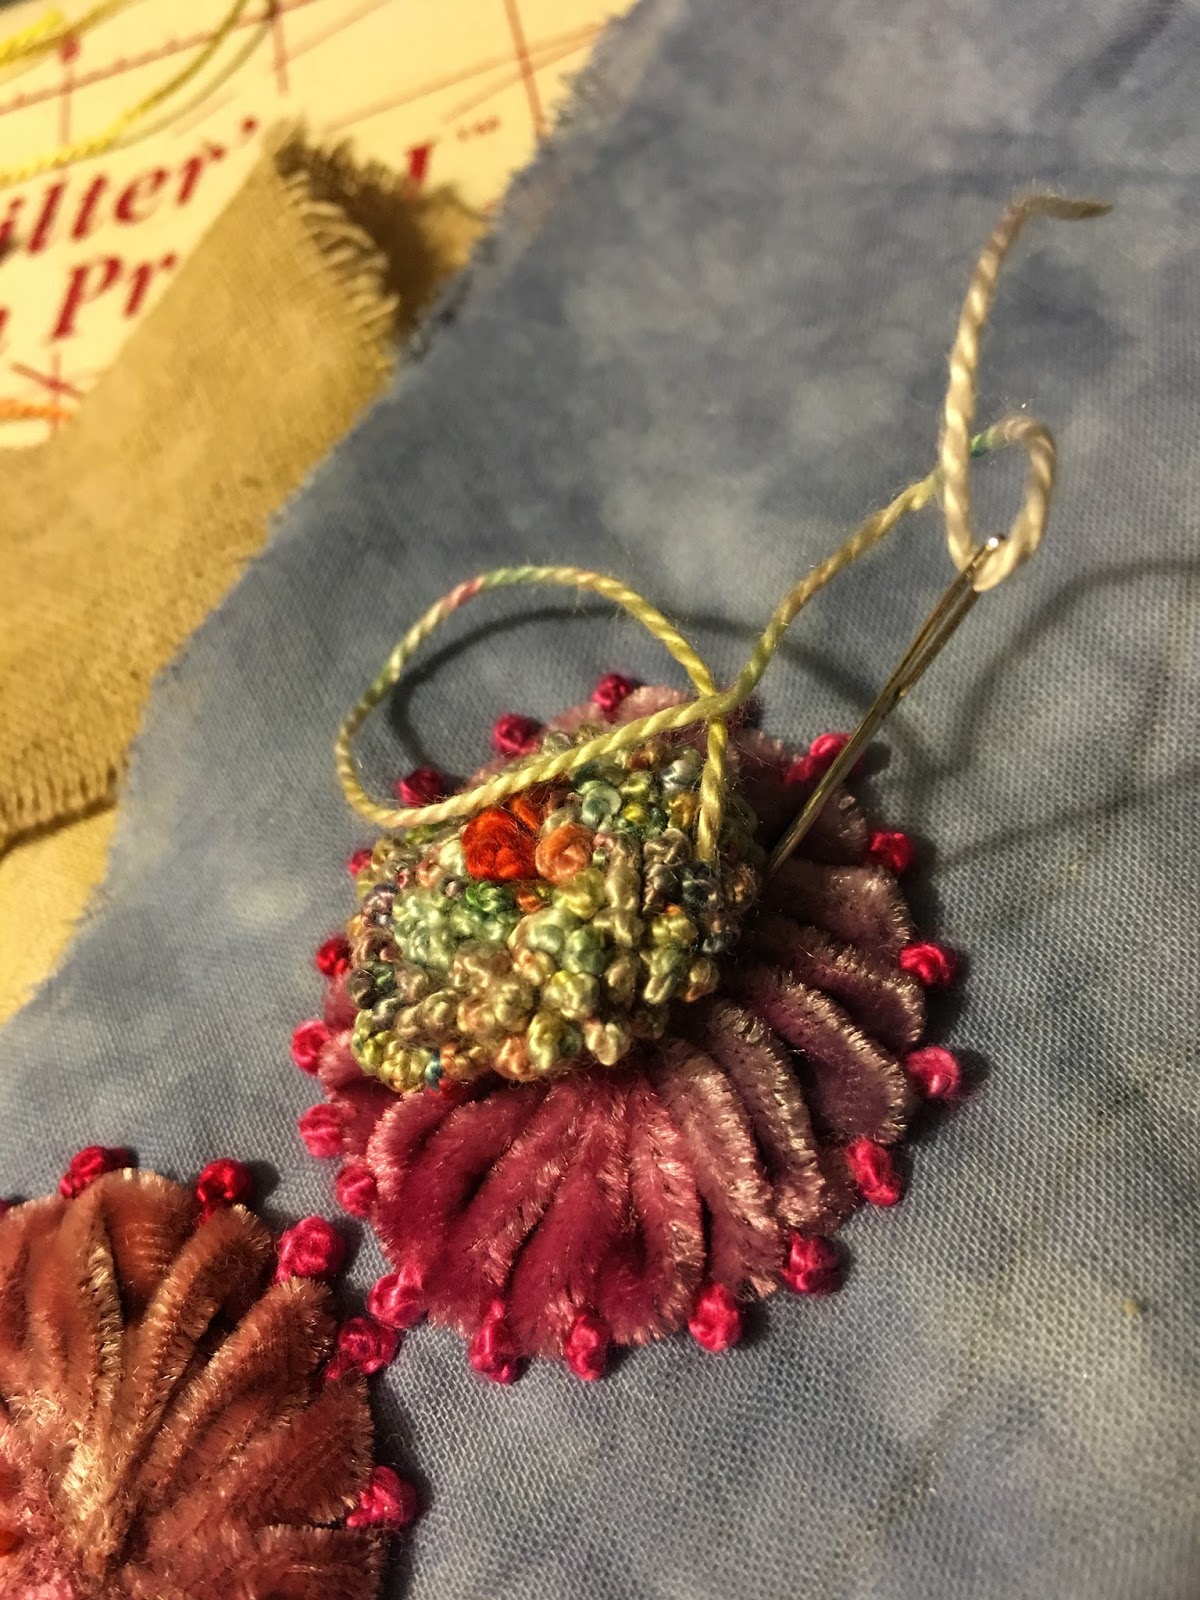
Draw a wavy line (stem) from each Yo-Yo flower.  Stitch a Stem stitch for each of the stems.

Add as many tiny flowers as you would like at the bottom.
Add a Rayon Ribbon trim to the top and bottom of the little flag.  Just scrunch the ribbon a bit and stitch on a button to hold it in place.
Add a backing fabric (trim down) and stitch along the edges.  To attach the layers together, stitch tiny seed stitches (tiny straight stitches) in a very random pattern.


Your little Prayer Flag should be done now!  I hope you have enjoyed my postings about my embellishments.  I adore embellishing and just playing with threads and unusual fabrics.

Leave a comment on this post, as well as the last post, by Sunday, December 4th, for your chance to win a kit to make your own Prayer Flag!  The winner will be announced on Monday!
Good Luck!

Thursday, November 17, 2016

"Yo-Yo Flowers" Mini Prayer Flag - Part 1


"Yo-Yo Flowers"

Susan Edmonson

Hey Ladies!  I am thrilled to be in this group of such talented artist!  However you guys are much more techie than I am, so I hope I can get this done right so you can all see it.  I'll give you a brief introduction of myself.  I live in Concord, NC close to Charlotte, married for nearly 39 years and have two sons, two daughter-in-laws and one sweet little 2 yr. old grandson.  I'm hoping for more of the latter!
Most of the work I do is embellished in a whimsical way.  I LOVE to embroider by hand, not machine!  I am a Bernina Girl through and through..... I just got another little 350PE Tula Edition to travel with.  I already had one other DragonFly 350, but felt I needed a backup for the other backups!  Yes, many machines. :)
The project I would like to share is dear to my heart and totally expresses all of my loves (well most).  I have been teaching for over 26 years and this has been one of my very favorite classes.  It is one little Prayer Flag from a series of many other little ones that can be strung together with ribbons.  I also am very much a natural fiber girl, cotton, linen, wool, silk, etc.  So all of my parts are one of these fibers or I probably don't use it.
I hope you enjoy this and they are great gifts as it is getting close to the Holidays!
For the give-away I have for you a kit of this project and a little hanger and the threads I use to embroider with.  I love the Painter's Threads Pearl Cottons!


Step 1:  Background
Cut a background fabric in a slightly weird rectangle about 4 1/2" x 6" or so.  I use Cotton Organdy that has been hand dyed, but not by my hands, Fiber On A Whim's hands.  Next cut a piece of Quilter's Dream Fusion Batting Request weight slightly smaller than the background fabric.  Note:  If you haven't tried this fusible batting it is AWESOME!  I use it for all my quilting on my Bernina 820, not a long arm though.  Fuse the batting to the back of the fabric.  This is the stabilizer.  There will be another fabric placed on the back later after all the stitching is completed.  Lay this aside for now.

Step 2:  Yo-Yo Flowers
Cut 3 circles 2 - 2 1/2" diameter from silk/rayon hand dyed velvet, again not by my hands, Hanna Silks.
To make this easy cut a square and just round off the corners.  Does not have to be perfect.
Stitch a running stitch along the edge of the circle about 1/8" from the raw edge.  Do not hem the edge.


For another Yo-Yo option you could make petals.  To do this when you take the thread to the back of the yo-yo, knot the thread.  Next, wrap the thread from underneath over the outside edge and take the thread back through the center.  Knot the thread again.  Repeat this however many times you like.  See the pics below.
Attach the flower to the background fabric.  Sew the flower in the center just to hold it on.  Next stitch Pistil Stitches (French Knot with a tail) around the edge of the velvet flower.


Saturday, October 1, 2016

And the Winner is. . . .

Thanks to everyone for your great comments!

There were 110 comments on the four posts and I used a random number generator to chose the winner

Surprisingly, it chose the last commenter!
SO, the winner of the FOUR Sun Printed Fat Quarters, 
TWO yards of Mistyfuse, and ONE Mini Goddess Sheet is:

Vicki

I sent an email to you Vicki.
Please email me with your mailing address and I will get these prizes out to you right away!

October's Queen Bee is Terri Stegmiller

Tuesday, September 20, 2016

SunLESS Printing

So one day I woke up wanting to sun print and this is what I saw outside . . .


. . . another day I've been busy with the family or work and missed the sun. . .


What is an artist to do?!? 
Improvise!

By creating a fake Sun or a Heated situation, I have found I can still produce great "Sun Prints."

1) Fake Sun

Following the instructions in this post, prepare the fabric and place the painted and masked fabric under a Fake Sun.  I like using shop lights. . .

. . . as well as my desk lamps.

Both create the same images I get outside in the bright sun.


The amount of time to create the Sunless print will depend upon the heat and humidity in your home or studio.

2)  Bottom Heat

By placing a heating pad underneath the painted fabric laid out on a cookie sheet, the same evaporation effect occurs and allows you to have a Sunless print!

3) Ironing

The fastest way to create a Sunless print is to use a very hot iron.  
I demonstrated this method on Quilting Arts TV Season 1700 and 1800.  

  • Simply place your painted fabric and heat-proof masks (I like to use shapes cut from overhead transparencies) on to a cookie sheet.  (Don't plan on using the cookie sheet for baking again!)
  • Cover the fabric with a Mistyfuse Goddess sheet.
  • With an iron set on the cotton setting, iron over the top of the fabric until dry.  This will take about 5 to 7 minutes of ironing.
  • Remove the Goddess sheet and masks to discover your fabulous designs!

Are you inspired to create some fabulous Sun Printed Fabrics of your own yet?  Go forth and create and then come back here on September 23rd to learn one more Sun Printed trick!

Leave a comment below to be entered for another chance at winning these four lovely Sun Printed Fat Quarters, Two yards of Mistyfuse and a Mini Goddess Sheet!


Saturday, September 17, 2016

Sun Print-paloza!

The seasons are a changing, and no matter the weather where you live, 
it's time to take advantage of sun printing!


Ideally the weather is hot, dry and windless for sun printing.


Pull out a table, or a large piece of board. . .


. . . grab some paint, fabric and masks (i.e. leaves, cut outs, stencils, hardware, etc) and get busy.


The basic instructions for Sun Printing are:
1) Wet your fabric with either a spray bottle or soak the fabric in water and squeeze out the excess water.  Lay the fabric on a table or board which can be placed in the sun.
2) Mix your paint of choice (see photo above) at about a two to one ratio - two parts water to one part paint - and, using a large foam or bristled paint brush, spread the paints across the fabric.  Use one or multiple colors.  It's all up to your creativity.
3) Place leaves, masks, keys, nuts and bolts, or whatever you like over the top of the painted fabric.
4) Leave fabric in the sun until the fabric has dried.  The sun heat sets the paint and so it is now wash fast, however, I am a creature of habit and always iron my fabrics before I wash them.


This process is much shorter, and more dramatic, in dry climates rather than in humid climates as the process is really working by evaporation.  As the water travels from under the masks, it draws the paint with it out from under the masks and creates an outline of the image.


But with the season's changing, maybe the sun isn't shining right now. . . 


. . . or it's the middle of the night and you want to create. . .
What's an artist to do???!!!
Well don't panic because. . .
Guess what?! 
There ARE ways to Sun Print WITHOUT the sun!

AND, I will tell you all about them in the next blog post. . .

In the meantime, leave a comment here about your experiences (if any) with sun printing for your opportunity to win FOUR Sun Printed Fat Quarters, TWO yards of Mistyfuse, and A Mini GODDESS SHEET!  The winner will be selected and announced on September 30th!


Don't forget to enter your email address over there on the right hand side so you will not miss the next post about how to Sun Print without the sun!  There will also be a post about layering Sun Prints, as well as a post with a fun project to make once you have created your sun prints (clue:  the project uses Mistyfuse!)

See you Next Week!

- Lisa Chin


Monday, May 30, 2016

Metallic Foil vs Metal Leaf

On the surface, metallic foil and metal leaf serve the same purpose: to add a metallic effect to your projects. However each material has strengths and weaknesses so there may be some uses that are more appropriate for one over the other. An informed decision will lead to a successful project, so I'll discuss each material in depth below.


Metallic Foil

Pros:

  • Extremely durable 
  • Can be washed by hand or machine
  • Can even be dry cleaned
  • Wide range of colors and visual textures available
  • Simple to use 
  • Easy to sew through

Cons:

  • Slightly plasticy-looking
  • More artificial and less genuinely metallic in appearance

Methods of application:

  • Foil glue
  • Gel medium
  • Any fusible product - fusible web, fusible powder, fusible thread, et al

Care of applied foil:

  • Machine or hand washable
  • Dry cleanable
  • Avoid severe abrasion
  • Do not iron directly on foil

Suggested uses:

  • Art garments
  • Bags and totes
  • Functional quilts
  • Decorative quilts
  • Fiber art


Metal Leaf

Pros:

  • Authentically metallic appearance
  • Lovely organic quality to application (imperfectly perfect)
  • Fairly simple to use 
  • Easy to sew through

Cons:

  • Delicate and more fragile during application and after
  • Can not be washed by machine or dry cleaned
  • Copper and gold leaf will get a patina over time, silver will not patina

Methods of application:
  • Gel medium is most highly recommended on fabric

Care of applied foil:

  • Spot clean by hand only
  • Avoid any abrasion
  • Apply a watered-down coat of gel medium to copper or gold leaf to prevent oxidation

Suggested uses:
  • Fiber art


I hope this helps you make a decision between metallic foil and metal leaf the next time your project needs a metallic effect. If you have any questions that I haven't answered, please ask them in the comments.

If you would like to win a set of 4 metallic foil colors, there will be a drawing from among all of the commenters on my posts this May on Friday, June 3. Please make sure there is a way to contact you in your comment!

~Jane Davila

Sunday, January 31, 2016

And We Have a Winner...

Blue Glue Gel and Freezer Paper

Thank you all so much for your comments over this past month. I put the names (and there were LOTS of them!) in a "hat" (really a paper bag) and had hubby pull the winner...

Congrats to:
CraftALife who commented on January 3rd. Please get in contact with me so I can send off your signed copy of Fabric Printing at Home and 1 yard of Prepared for Dyeing cotton (My email is: threadborn@cox.net).

For those of you who didn't win...I hope that you enjoyed these tutorials. You can find many more interesting fabric printing techniques using materials you have at home in my book, Fabric Printing at Home. Why not pick up a copy? It's a great family-friendly reference!


If you haven't already signed up for my FREE online newsletter, Julie B Booth Surface Design News, hop on over to my blog...the sign up is in the right-hand column. The newsletter arrives in your email about once a month and has lots of kitchen-inspired fabric printing projects.

The "reboot" of The Printed Fabric Bee continues on February 7th with the first post by Susan Purney Mark. Susan will be focusing on using painted fusibles to create texture and design on fabrics. Sounds really interesting!

Sunday, January 24, 2016

Kitchen Resists with Julie B. Booth: Freezer Paper Masks and Blue Glue Gel Resist

Get some lovely color effects with freezer paper masks and glue gel resist.

Welcome to my final Kitchen Resists tutorial.  In this one we really "layer it on" using freezer paper masks and a resist made from blue school glue gel. If you can't find the blue glue gel- clear glue gel or white glue will also work. The fabrics I made in this project have many paint layers, but you can choose to apply fewer layers and still get some great results.

Don't forget to leave a comment at the end of this post or my posts from January 3 or January 10 in order to be eligible for my giveaway of a copy of my book, Fabric Printing at Home: Quick and Easy Fabric Design Using Fresh Produce and Found Objects, plus one yard of Prepared for Dyeing cotton. I'll be choosing a winner on January 31.

Layer it On! Freezer Paper Masks and Blue Glue Gel Resist
You will need the following materials for this project:

To create the mask designs:
  • Prepared for Dyeing cotton fabric (or pre-washed 100% cotton fabric). I used 12" x 15" pieces.
  • Freezer paper (I use Reynold's).
  • Craft knife with #11 blades.
  • Self-healing cutting mat.
  • Optional: Small sharp scissors.
  • #2 pencil (optional).
  • Iron and ironing board.
  • Optional: Pressing cloth.

To create resist designs:

A Detailer Writer is a small squeeze bottle with a precision tip. Use it if you want finer lines.

To paint over the designs:
  • A flat work surface covered with plastic. I like to make 15" x 20" Portable Work Surfaces with foam board covered with plastic film. Go here to learn how to make them. 
  • A 15" x 20" piece of cotton or muslin for each Portable Work Surface. This fabric will act as a blotter when painting over the resist-covered fabric.
  • Masking tape.
  • Transparent fabric paints (I like to use Pebeo Setacolor Transparent fabric paints). Use colors straight out of the bottle or mix custom colors starting with the lightest color and gradually adding darker colors. Dilute to the consistency of light cream to help prevent breaching of (breaking through) the resist (If you use Setacolor, it will be about a 1:1.5 ratio paint to water).
  • Opaque fabric paints (I like to use Pebeo Setacolor Opaque fabric paints). Use colors straight out of the bottle or mix custom colors. Do not dilute.
  • Plastic containers and spoons for mixing paints.
  • Foam brushes to apply transparent paints.
  • Foam daubers to apply opaque paints. Go here to learn how to make them.
  • Dense foam brayers (I use Testrite) to apply opaque paints.
  • Glass or Plexiglas palettes to roll out opaque paints.
  • Wipe-up cloth.

To set and remove the resist:
  • Iron and ironing board.
  • (2) Pressing cloths.
  • Plastic tub that fits in your kitchen sink.
  • Liquid dishwashing soap.
 
Torn Freezer Paper Masks
To create the fabrics in this project start by tearing strips of freezer paper. Iron the strips onto the fabric with the plastic-coated side facing the fabric. Strips can be ironed on horizontally, vertically or to create a grid pattern. (Optional: Use a pressing cloth over the strips to protect the iron)


First Layer: Painting Over the Strips
Paint the uncovered fabric between the freezer paper strips with alternating colors to create beautiful backgrounds with interesting color mixing.

1. Mix up two colors of transparent fabric using either the normal dilution (1 part paint to 2 parts water) or the slightly thicker dilution (1 part paint to 1.5 parts water).
2. Use foam brushes to apply the paint. Alternate the two colors and paint the fabric between strips. Paint up to and along the edge of the torn freezer paper. 


3. Let the paint dry completely before removing the freezer paper.

       
Notice the beautiful color mixing created by this technique.


Second Layer: Drawing Blue Glue Gel Designs
Draw designs with blue school glue gel. When dry the glue acts as a resist when adding more paint layers.

1. Use blue school glue gel directly from the bottle or squeeze some into a plastic Detailer Writer. Draw designs on the painted fabric.


2. Let the glue dry completely.


Additional Layers of Paint
After the blue glue gel dries use some of the following techniques to add paint layers over the resist.

1. Tear additional freezer paper strips and iron them onto the fabric covering different parts of the fabric from the first round (I suggest using a pressing cloth to protect your iron).


Tear additional freezer paper strips and iron them over the dried glue designs.

2. Or use a craft knife and self-healing cutting mat to cut out designs from a sheet of freezer paper, then iron it to your glue-covered fabric.
3. Mix up additional colors of either transparent fabric paint (1:1.5 ratio paint to water) or opaque paint.
4. Tape a piece of cotton or muslin to your Portable Work Surface and then tape your fabric with torn or cut freezer paper designs on top. The fabric underneath will act as a blotter, absorbing the excess transparent fabric paint, and preventing breaching of (breaking through) the resist.


Tape a piece of muslin or cotton underneath the glue-covered fabric to prevent additional layers of wet paint from seeping under the resist.

5. Use foam brushes to apply transparent fabric paint to the uncovered areas. Paint up to the edges of the torn freezer paper masks as you did with the first layer of paint. Optional: Use a wipe-up cloth to pick up excess paint.


6. To apply opaque fabric paint over torn strips or craft knife-cut designs, use foam daubers to daub paint over the exposed fabric areas and along the edges of the freezer paper masks.


7. For a soft pastel texture roll over the freezer paper masks with a paint-covered dense foam brayer. Spoon 1/4 teaspoon of opaque paint onto the glass palette. Roll out the paint until the brayer is evenly coated. Then roll over the freezer paper masks.


8. You can use one, two or all three of these paint application techniques for different effects. See the finished fabrics below and read the captions to see the sequence of paint layers.


Setting the Paint and Removing the Resist
1. See the instructions from my first blog post for setting the fabric paint.
2. To remove the blue glue gel resist: Place the resist-covered fabric(s) in the plastic tub. Add warm water and some liquid dishwashing soap. Let the fabric(s) soak for at least 10 minutes to soften the glue. Rub to remove the resist or use a soft toothbrush. You will need to occasionally dump and refill the tub with warm soapy water until all the resist is removed.

3.  I like to put the fabric through a delicate machine wash (warm or cold water with some detergent), just to be sure that all the resist is removed.
4. Machine or air dry.


Below is a selection of fabrics created with these techniques.

1. Red and blue transparent fabric paint applied over torn freezer paper strips. 2. Blue school glue gel designs drawn on fabric with Detailer Writer. 3. Second layer of torn freezer paper strips ironed to fabric exposing different areas. 4. Red and blue transparent fabric paint applied in opposite sequence to first application.


1. Yellow-green and blue transparent fabric paint applied over torn freezer paper strips. 2. Blue school glue gel designs drawn on fabric with a Detailer Writer. 3.Second layer of torn freezer paper strips ironed to fabric to expose different areas. 4. Rust brown and red transparent fabric paint applied to exposed areas. 5. Removed freezer paper strips and ironed on a new layer of torn freezer paper strips to expose different areas to paint. 6. Blue, light green and turquoise opaque fabric applied to exposed areas with a foam dauber.


1. Light blue and blue-violet transparent fabric paint applied over torn freezer paper strips (strips ironed onto fabric to form a grid design).2. Blue school glue gel designs drawn on fabric with Detailer Writer. 3. Designs cut out of a sheet of freezer paper using a craft knife. 4. Freezer paper with cut designs ironed to fabric. 5. Turquoise paint applied to open areas of freezer paper mask using a foam dauber. 6. Black paint applied over open areas of freezer paper mask using a dense foam brayer. 7. Freezer paper mask removed and fabric painted with violet transparent fabric paint.

Thank you for joining me for this first month of The Printed Fabric Bee's "reboot". I hope you've enjoyed learning about a variety of Kitchen Resists and will give them a try. For more projects like these sign up for my free online newsletter, Julie B Booth Surface Design News by going to my blog (sign up is in the right-hand column) OR pick up a copy of Fabric Printing at Home!

Remember to leave a comment for a chance to win. I'll be back to announce the giveaway winner on January 31. Good luck!