
 |
| Using liquid dishwashing soap as a resist. |
Welcome to the first installment of The Printed Fabric Bee's reboot! Bee members are planning an exciting year of mini-workshops, projects and giveaways. It's going to be a lot of fun and I have to tell you that I also can't wait to learn some new techniques from my fellow Bee members!
Just a quick introduction...I'm Julie B. Booth and I'm probably best known in the surface design world as the artist who gets inspired every time she walks into the kitchen! I got serious about my kitchen explorations about six years ago when I won a grant from my local fiber guild to research "kitchen resists". For an intense eighteen months I tested and fiddled and cooked and concocted. AND I learned a lot! After sharing my results with my guild, I realized that I wanted to go a step further and see what other surface design possibilities resided in the kitchen. The result was the publication of my book, Fabric Printing at Home: Quick and Easy Fabric Design Using Fresh Produce and Found Objects (Quarry Dec. 2014). My book is loaded with surface design projects that use items and materials you probably have at home right now! And my giveaway this month will be a copy of my book plus one yard of Prepared for Dyeing Cotton so you can get started right away making your own Custom Kitchen fabrics! To be eligible to win, you need to leave a comment on this post or one of the next two posts this month. I'll be choosing a winner on Sunday, January 31.

My posts, this month, focus on a few Kitchen Resists (you can find out about additional resists in Chapter 6: Irresistible: Fabric Resists Using Kitchen Ingredients) and some different techniques creating backgrounds and applying the resists. I even have one post that will get you ready for the next holiday on the calendar...Valentine's Day!
Just one more thing before we get to today's project...I'm still at it in the kitchen and I have a free online newsletter, Julie B Booth Surface Design News, where I continue to share new surface design discoveries. If you'd like to sign up, hop on over to my blog and you'll see the sign up in the right-hand column.
Kitchen Resists #1: Rubbings with Liquid Dishwashing Soap
In this project, you'll place texture plates under your fabric and then roll liquid dishwashing soap over the fabric to pick up the texture designs.
You need:
- A work area covered with plastic. I like to make Portable Work Surfaces with foam board covered with plastic film. Go here to learn how to make one.
- (2) pieces of Prepared for Dyeing Cotton fabric (or pre-washed white 100% cotton fabric) for each finished fabric you wish to make. One of these pieces will act as a blotter when applying the resist. To start, tape just one piece of fabric to the work surface. I cut 15" x 15" squares.
- Transparent Fabric Paints (I like to use Pebeo Setacolor paints). Choose 3 or 4 colors.
- Water to dilute the paints, to remove the resists and for clean up.
- Plastic containers and spoons for mixing paints.
- Foam brushes.
- Liquid dishwashing soap.
- Dense foam brayer (I like Testrite brand).
- Glass or Plexiglas palette.
- Texture rubbing plates. I like to make my own with hot glue on recycled cardboard but you can also use commercial texture plates.
- Optional: Wipe up cloth or paper towels.
- Iron and ironing board.
- (2) Pressing cloths (or pieces of cotton or muslin).
- Optional: Plastic tub to put fabrics in to remove resists.
 |
| Some of the supplies needed for this project. |
Paint a Background
I like to paint a simple background design before applying the resist layer. This can be stripes or blocks of color.
- Dilute the fabric paints. For Setacolor, I usually dilute to 1 part paint to 2 parts water but if you want a pastel, add more water.
- Apply the paint colors to the fabric with foam brushes.
- Let the paints dry completely before moving to the next step.
 |
| Paint stripes or blocks of color on your fabric. |
- Tape the blotter fabric onto the work surface and then re-tape the painted fabric on top of it.
- Slip a texture plate under the painted fabric (not under the blotter fabric).
- Squeeze a small amount of liquid dishwashing soap onto the glass palette and roll the foam brayer over the soap until it is evenly coated.
- Roll the soap-coated brayer over the fabric covering the texture plate. You may need to roll over the area several times until you see the design emerge on the fabric.
- Shift the texture plate to another area and repeat.
- When you are done applying the resist, let it dry before moving to the next step.
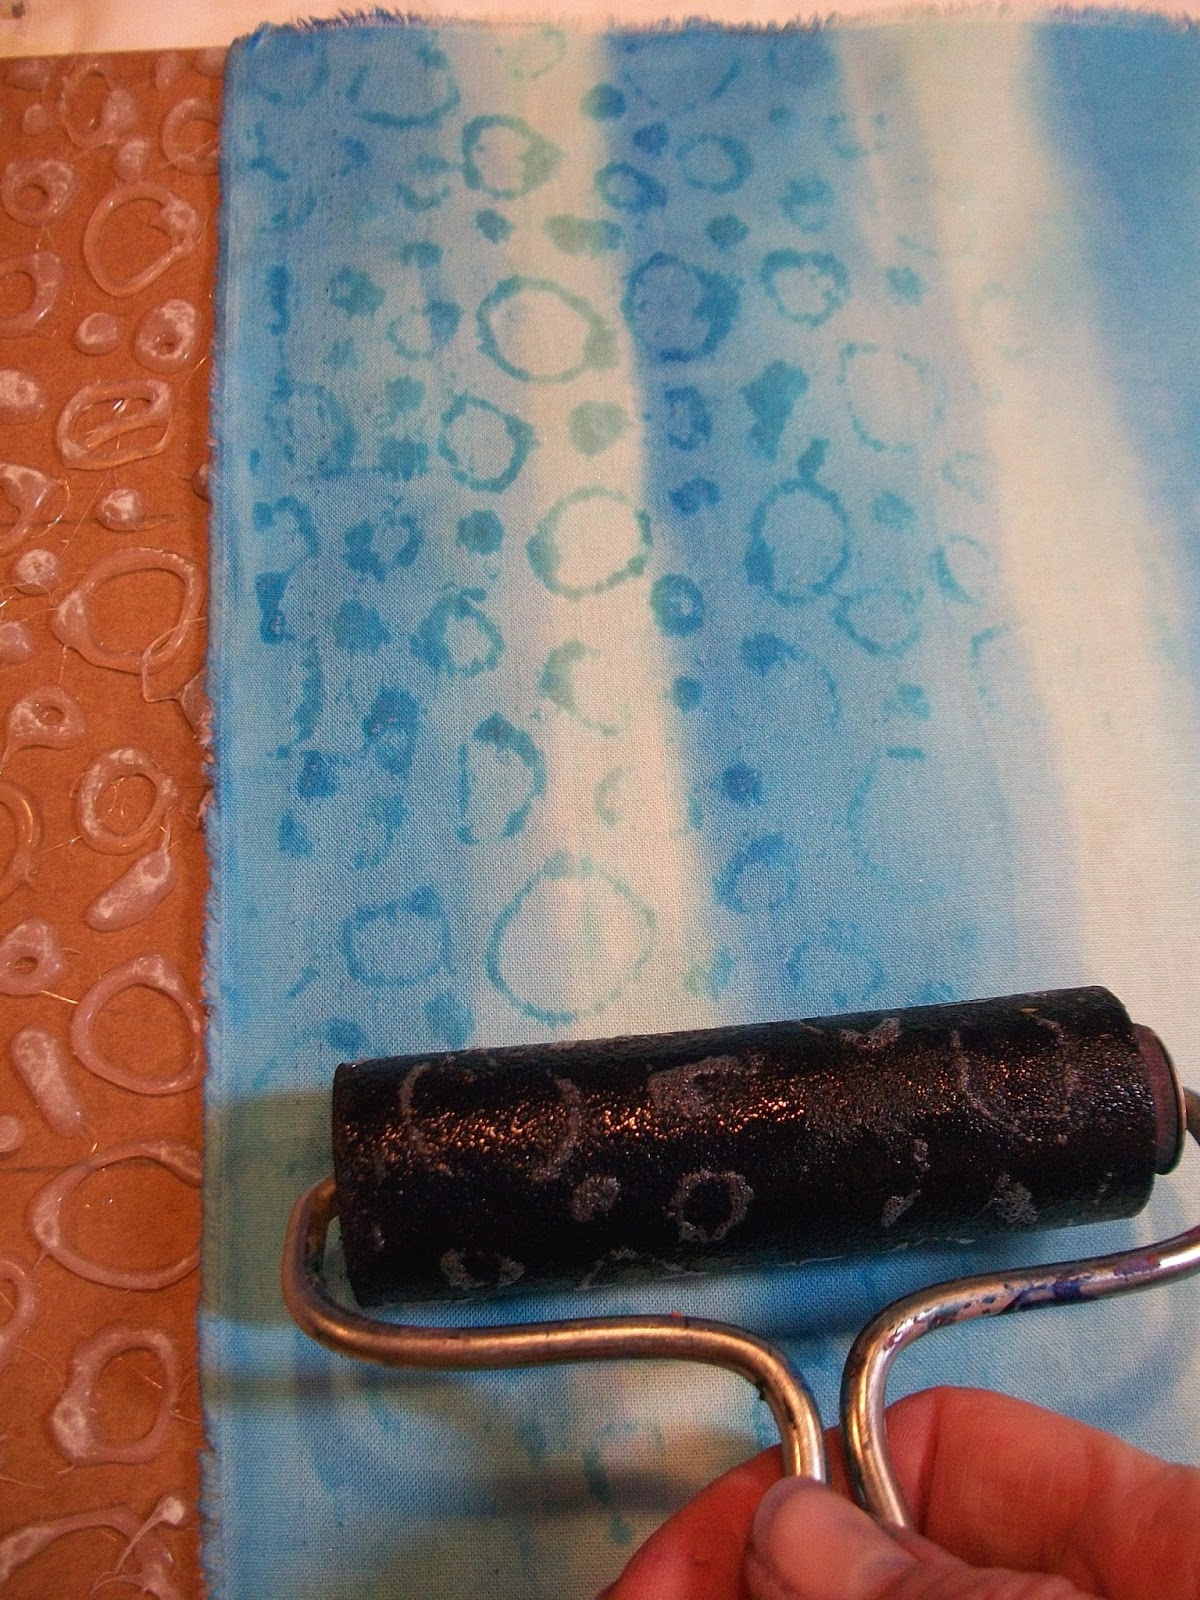 |
| Slip a texture plate under the fabric and roll over the covered area with the resist. |
Paint another Layer
- In order to see the resist designs, you'll need to add another layer of paint. The resist will prevent the paint from reaching the fabric's surface. Mix up some paints that contrast with the first layer. This time, you'll need to mix a thicker dilution to prevent breaching (breaking through) the resist. The blotter fabric will also help. For Setacolor Transparent paints mix to the consistency of light cream (about 1 part paint to 1.5 parts water).
- Brush the paint over the resist. If the paint starts to pool on the fabric, use the wipe up cloth or paper towels.
- Let the paint dry completely.
 |
| Paint another layer to reveal the resist designs. |
Set the Paint and Remove the Resist
- You need to permanently set the paint before removing the resist. Most fabric paints are heat set. Setacolor paints require five minutes of heat setting.
- Sandwich the resist-covered fabric between two pressing cloths. Set the iron to the cotton setting and iron for half the time on one side before flipping the entire sandwich over to iron from the other side.
- Now that the paint is set, you can remove the resist. Soak the fabric in water and rub to remove the resist. You'll notice that the water will turn colors. Don't worry, this is just the paint that was sitting on top of the resist. Continue until the resist is completely removed.
- I like to put the fabric through a delicate machine wash (cold water and in this case, no soap is needed) just to be sure that all the resist is removed.
- Machine or air dry.

What Can I Do with My Fabric?
Why not turn your fabric into a decorative mat or table runner. Go here to find out how.

I hope you enjoyed this first project. If you have questions, feel free to leave a comment. If you want to be eligible to win...also leave a comment! My next post is Sunday, January 10.
A reboot can often be a very good thing! Cleans out the old and refreshes the new. I'm in! Happy New Year, Julie!
ReplyDeleteHappy New Year Michele! Yes...it was time for a change. I'm looking forward to all the tutorials myself!
DeleteA reboot can often be a very good thing! Cleans out the old and refreshes the new. I'm in! Happy New Year, Julie!
ReplyDeleteThis will be a good fiber year! Thanks for posting in the facebook gelli plate group!
ReplyDeleteIt's a great group...always so willing to try new things! Thanks for commenting.
DeleteTwo great ideas - dish soap resist, and hot glue on cardboard for rubbing plates. Can't wait to try them both. Thank you, Julie!
ReplyDeleteThank you for the new ideas . Wishing everyone a healthy happy creative new year.
ReplyDeleteThanks, Sue. Hope your year is full of creative endeavors!
DeleteWonderful ideas! Happy Creative New Year! Looking forward to trying dying this year!
ReplyDeleteA Creative New Year to you too, Allison!
DeleteThought I knew all the possibilities, but this one is new to me!
ReplyDeleteGlad I could offer something new to you Kim! Seems the longer I'm at this, the more new things pop up!
DeleteGlad to see the Bee still lives! Thanks for the inspiration!
ReplyDeleteYay! The Bee is alive and well...enjoy!
DeleteThis is awesome! This technique is completely new to me and I am very inspired. Thank you!
ReplyDeleteSo happy to have inspired you! I think it's going to be a great year for the Bee!
DeleteWow, what a result. I love the Color combinations. This is awesome! Thank you for the Inspiration.
ReplyDeleteYou're welcome, Karla. Have fun with the technique!
DeleteLooks like a fun times! Time to pull out the Rubbing Plates!!
ReplyDeleteYesiree! Have fun!
Deletegreat ideas. thanks.
ReplyDeleteYou're welcome, Katie...hope you give it a try.
DeleteThis is so new to me! I am very excited to try it out. Thank you!
ReplyDeleteHope you do try it out Kathryn...and then post your results!
DeleteI always enjoy your "experiments" as I too like to try different things. It would be great to have a copy of your book also. gjeneve@gmail.com
ReplyDeleteYou're now officially eligible...good luck with the drawing. Hope you have some fun with these ideas!
DeleteThis is so fun!! I was dyeing fabric long before it was the 'thing' to do. Looking forward to stretching my dying knowledge! Thank you so much. The year is looking brighter already!!
ReplyDeleteWell...have fun...Hope you post your results!
DeleteThis is so fun!! I was dyeing fabric long before it was the 'thing' to do. Looking forward to stretching my dying knowledge! Thank you so much. The year is looking brighter already!!
ReplyDeleteGreat tutorial. Would love a copy of your book.
ReplyDeleteThanks for sharing!
Thanks Cheryl...good luck with the drawing.
DeleteThe accompanying photos helped. Thanks.
ReplyDeleteGlad that they helped, Claudia...I always think having some photos makes it easier to explain techniques.
DeleteYou explained your technique very well and it looks entirely do-able. Thank you for the inspiration.
ReplyDeleteIt IS doable...I love how easy this particular resist is...especially the clean up :)
DeleteI have a lot of texture plates from crafts long ago! I'll have to try something like this with thickened dye.
ReplyDeleteOne of my students tried this technique with thickened dye and it worked quite well.
DeleteThanks for the great tutorial. The whole project looks like it is very I might be able to do it!
ReplyDeleteGive it a try, Marti...it's really easy and fun!
DeleteGreat tutorial - I shall be trying this - thank you!
ReplyDeleteThanks Gill...can't wait to see your results!
DeleteWho would have thought it.. Lol washing up liquid.. And it works! Well I am impressed! I am going to have to try this. Thank you. Giselle
ReplyDeleteYes...a great resist and so easy to clean up! Have fun Giselle!
DeleteWow!!! I NEVER would have thought of using dishwashing liquid as a resist. Incredible! Thanks for sharing.
ReplyDeleteYou're welcome, Nancy. Hope you give it a try!
DeleteA Great IDEA, I would have never thought of using dishwashing liquid as resist. Can't wait to try this!
ReplyDeleteGreat...have fun with it!
DeleteVery inspiring, creatively speaking. I already have the book, having won it during your blog book tour for it's introduction. Time to get out the paints and fabric!
ReplyDelete~Louise
Well...you can win a copy for a friend? Hope you've been enjoying the book, Louise!
DeleteMust try our UK Fairy Liquid washing up liquid!
ReplyDeleteThis sounds to be so much fun, will have to try it, thank you so much : )
UK Fairy Liquid...now that's a really interesting name! Let me know how it works...
DeleteThanks for the tutorial Julie, great idea & great to use everyday things!
ReplyDeleteThanks, Linda! Appreciate your comment (and your beautiful work!).
DeleteWhat is it about blue Dawn dish soap -- it will do anything! Seriously, though, a big thanks to you for taking on this experimenting and sharing the results with us! I have FOR YEARS wanted to find an easy, simple, find-it-in-the-pantry method of resist for dying and coloring fabric, and here you have shown me the easiest one I've ever seen! Thank heavens I don't have to chip dried flour off of fabric to make a resist (I really was not looking forward to trying that one!) Thanks Julie! I've subscribed!
ReplyDeleteWell Sharon...I will be showing a wheat flour paste resist next Sunday (:))! Dawn is great stuff...though any dishwashing liquid that isn't really watery will work. Thanks for subscribing!
DeleteUsing Dawn dishwashing soap as a resist is brilliant! So much easier to wash out than dried gel glue.
ReplyDeleteThank you for sharing, and Happy New Year!
Yes...it is! Hope you give it a try!
DeleteLove what you did! Never would have thought to use Dawn as a resist! Thank you for sharing this!
ReplyDeleteYou're welcome...hope you have some fun trying it!
DeleteWhat a neat idea! Thanks for getting us all involved in the process
ReplyDeleteHope you give this a try, Susan.
DeleteThis looks like a fun process and a great book.
ReplyDeleteI will say that I really enjoyed writing the book ... the projects are very family friendly and most of the materials you probably already have at home...which is the coolest part!
DeleteNever heard that you could use soap as a resist. What a great idea!
ReplyDeleteI see that I might have to break a new year resolution- I was going to cut out buying books this year....
I'd be honored to be the first break from your resolution...though I probably need to make the same one myself...
DeleteI love the plaid effect and the subtle resist pattern. Good to hear that clean up is easier than working with glue.
ReplyDeleteGlad you enjoyed the post, Gail..."yes" a lot easier!
DeleteI love to see the "Bee" is up an going again and I love the new concept. This technique looks like great fun and I can't wait to try it :-)
ReplyDeleteThanks for continuing to be a follower of the Bee, Deb! This is a fun technique...so easy!
DeleteThis is something I want to try. I am to working only with products that are not very toxic and soap and the pebeo paint certain meet that criteria. Thanks for sharing.
ReplyDeleteYou're welcome, Sandy. In my book, I'm very conscious about using non-toxic materials...lots of recyclables too.
DeleteSo happy to have found you. Great tutorial and I'm looking forward to seeing your book.
ReplyDeleteHappy you found out about this too, Susan! Good luck in the drawing but hope you consider getting it in any case...I have lots of great techniques and projects...all family friendly, non-toxic etc.
DeleteAwesome, thanks for the motivation to get working.
ReplyDeleteHappy to hear I've been a motivation! Stay tuned throughout this year...there will be lots of excellent tutorials to come!
DeleteI never would have considered dish soap as a resist. This is something I will have to experiment with.
ReplyDeleteGive it a try...lots of fun and easy clean up!
DeleteDish soap, would never have thought of that. I need suggestions like that to break out of old ideas. And I need motivation.
ReplyDeleteI'm sure that there will be lots of great "outside the box" ideas from Bee members this year...so stay tuned!
DeleteI cannot wait to try this ... well I have to wait, but I wish I didn't. This is going to be fun!
ReplyDeleteWhen you get the chance...have fun with it!
DeleteWhat a different design surface technique, I like your approach. If this is a sample of what's to come, would love to see what treasures your book holds book..😀
ReplyDeleteHi Debbie- I have a whole chapter on kitchen resists...including some very original recipes. Other chapters in my book include found object and kitchen textures, printing with fruits and veggies, creating printing plates and stencils with food wraps and foil and a whole chapter on recyclables....hope you consider giving it a look!
DeleteI'm already making some changes in my art making but I'll add this technique just to 'learn something new today'! Thank you in advance!!
ReplyDeleteSo glad you stopped by Mary Ann! If you do use this technique...would love to see the results!
DeleteI love the swirl print you made, nice soft colors
ReplyDeleteThanks, Amy. Hope that you give this simple technique a try!
DeleteI have just started dyeing so I am glad I ran across your blog - thanks!
ReplyDeleteI have just started dyeing so I am glad I ran across your blog - thanks!
ReplyDeleteGlad you did too, Carolyn. It's going to be a great year here with lots of free tutorials and giveaways!
DeleteLove your fabric and techniques! Would love to win a copy of your book!
ReplyDeleteHey there Deb! Glad you're enjoying the tutorials. It's been fun! Good luck on the drawing!
DeleteGreat ideas!
ReplyDeleteThanks, Diane...hope you try this out!
DeleteI so want to try. Cool technique and thorough instructions
ReplyDeleteReally ...so easy...You just need the fabric paint. Everything else you probably have at home...
DeleteWow! what great ideas. I love that you use things in your kitchen and recycle things.
ReplyDeleteMy favorite thing to do...use stuff that I have! Glad you're enjoying the tutorials!
DeleteYou are truly inspiring. Thank you!!
ReplyDeleteThank you, Debra! Hope you try this resist...lots of fun!
Deletethank you for taking the time to so very clearly explain each step and the need for them! eye opening and inspiring!
ReplyDeleteThank you...I love to teach so that is the highest compliment!
Deletethank you for so very clearly explaining each step and the need for them! eye opening and inspiring!
ReplyDeleteGlad you enjoyed the tutorial!
DeleteThanks for the ideas - I have used the blue gel glue resist, but adding the freezer paper masking technique give such rich and complex results!Endless possibilities here!
ReplyDeleteSo glad that you enjoyed the tutorial, Susan!
DeleteIngenious -- thank you for sharing your techniques
ReplyDeleteMy pleasure, Frances!
DeleteI love the "underwater bubbles". I hope to try this soon.
ReplyDelete