
I love Shiva Paintstiks. I really do. My Paintstik class is one of my favorites to teach. Often,
students admit they have hoarded collections of Paintstiks but never opened the
packages! Somehow Paintstiks seem too intimidating to use. This month, my posts
on this blog will be all about Shiva Paintstiks – what are they, how you can use
them, and what supplies will be useful.

Paintstiks are basically oil paint crayons. They consist of three
ingredients: pigment, wax, and linseed oil. The pigment provides color, the wax
provides structure for the Paintstik (and makes it sort of like a crayon), and
the linseed oil helps transfer the pigment to the fabric.
 |
| I did this quick study with a rubbing plate for the flower, construction fence for the grid, and a stencil for the dots. While the flower alone was fun, more layers can create an interesting overall image. |
After you apply the Paintstik to your fabric, the paint needs to dry or cure. The linseed oil will dissipate. This can take a few days or even longer, depending on the humidity in your location. I sometimes take my project down to our laundry area and hang it near our dehumidifier to speed the process along.

You can heat set Paintstiks on your fabric and then you are
safe to throw the painted fabric into the washer and dryer. Never dry clean a
project that contains paint from Paintstiks. The dry cleaning fluid will ruin
your paint – enough to know there was an issue but not enough to completely
remove the paint for a fresh start. So, no dry cleaning.
 |
| To heat set, layer parchment paper, paper toweling, and your painted work, paint side down. |
To heat set, I use my iron, parchment paper, and some paper towels. set your iron for the fabric type. Cover your ironing surface with parchment paper to protect it and then I layer a few paper towels on top of the parchment paper. With your painted fabric face down (paint side on the paper towels), press each section of the fabric for about 15 seconds.
 |
| I created this fun Paintstik panel with two Paintstik colors, one commercially available grey cotton fabric, and one purchased stencil. I'll share how I did it in my third post for this month: Paintstiks & Stencils |
If you are in a hurry and you don’t have time for the paint to cure, you can heat set your work early, but expect to lose some pigment. When you heat set early, you’ll see the telltale oil residue on the paper towels. You’ll also see the color you lost.
 |
| I painted this fun piece with a single stencil on black cotton using iridescent Paintstiks in metallic colors. |
I like to use Paintstiks with rubbing plates to create texture and with stencils to create more refined images. I especially like mixing up these two techniques for a more complex effect. In the next post, I’ll show you how to use Paintstiks with rubbing plates. I’ll also share one of the most useful tools I have in my studio and instructions for cleaning up.
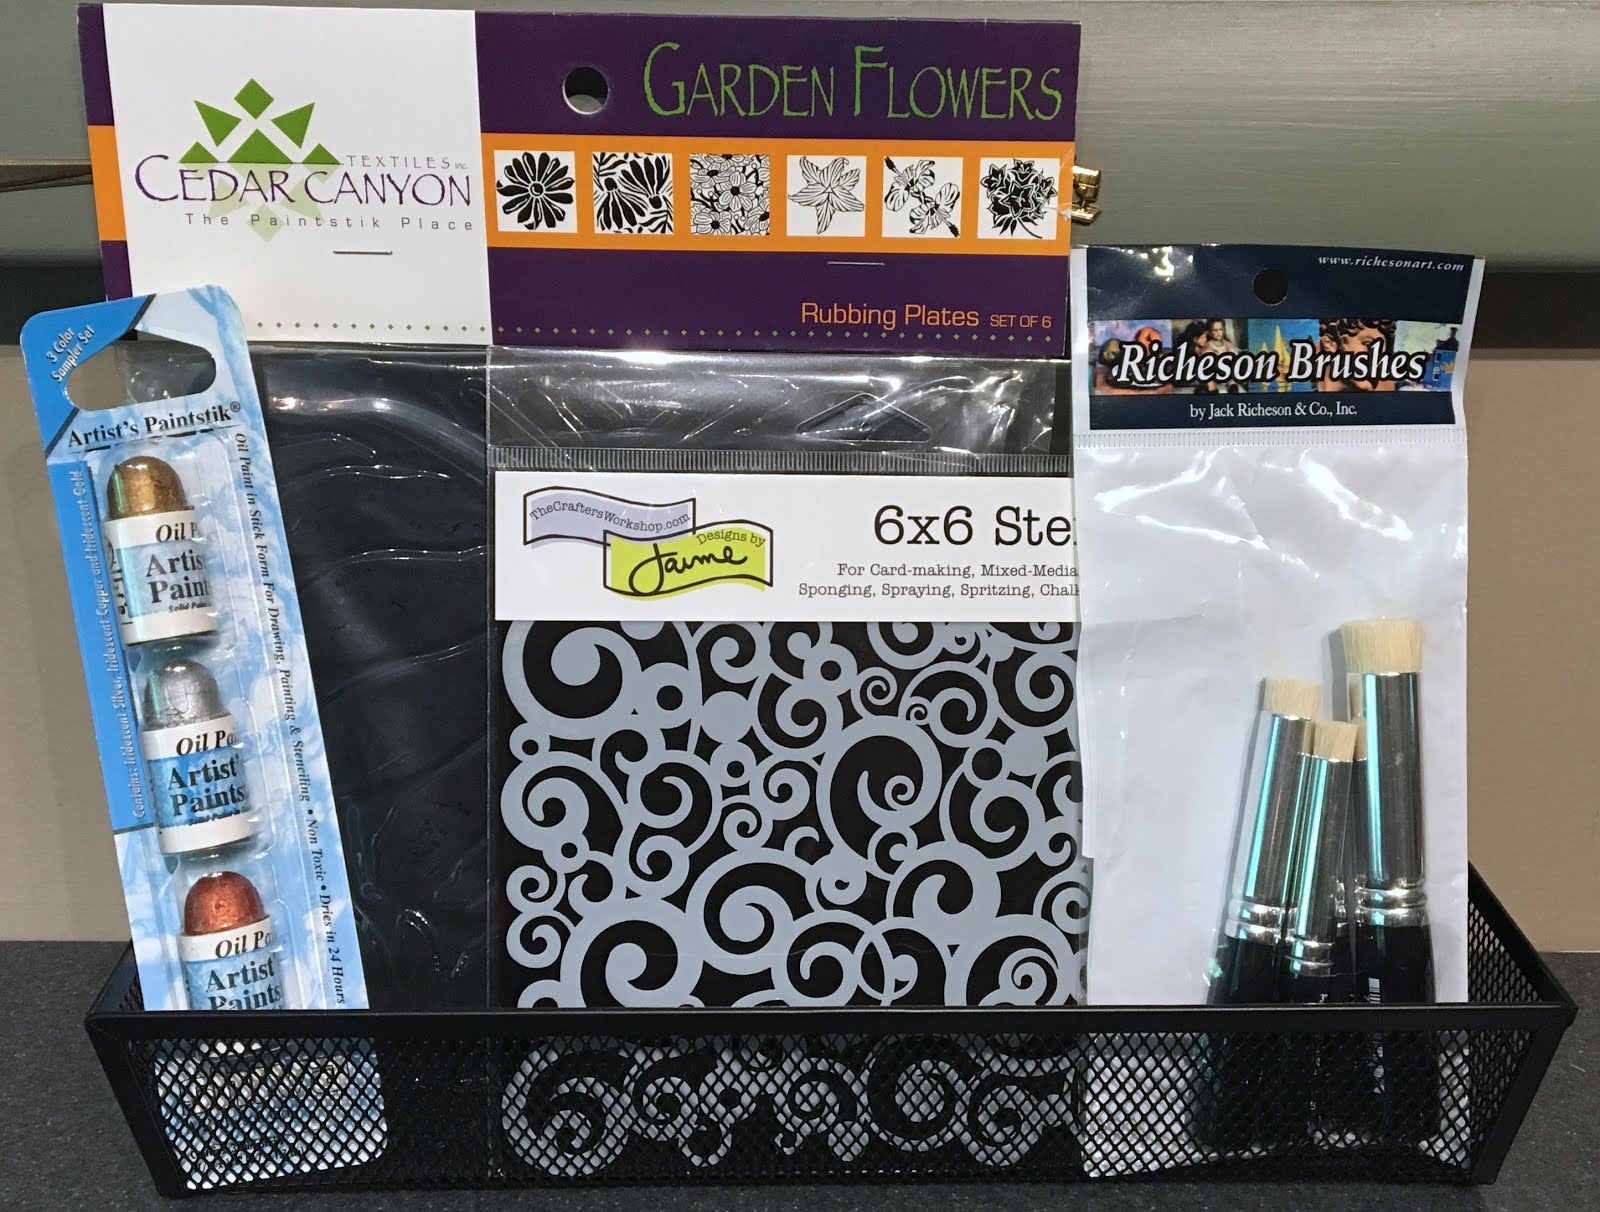 |
| The prize for this month's drawing: a set of 6 rubbing plates, one stencil, four stencil brushes, and a set of iridescent mini Paintstiks in metallic colors. |
Would you like some Paintstiks of your very own? Comment on any of my Printed Fabric Bee posts this month and you will be entered in a drawing to win some cool Paintstik stuff! I also invite you over to my website, www.MoonlightingQuilts.com, and my own blog, www.MoonlightingQuilts.Wordpress.com.
I'm in love with the Shiva Paintsticks..... Also use them for rubbings! Anxious to see what you have to show/teach us.
ReplyDeleteMe, too! I now look at the world as a place filled with texture!
DeleteLooking forward to see what you do with them! I have unopened paint sticks calling to me....
ReplyDeleteGet ready to pop those puppies open! It's easy!
DeleteThanks for info on the Shiva Paintsticks. I have been interested in trying them but just didn't know enough about them. Can't wait to give it a try!
ReplyDeleteTammi, this is your month! I hope you enjoy playing with Paintstiks.
DeleteFeeling inspired....
ReplyDeleteMe, too! :)
DeleteLooking forward to your posts. Have used paintsticks a bit, but need to learn more. Thanks...
ReplyDeleteI hope you pick up something new!
DeleteI've tried painsticks in the past and did not like what I made. I'm hoping your posts will help to educate me in the best way to use them!
ReplyDeleteHow disappointing! I hate when that happens. I hope I give you some ideas that help.
DeleteI haven't tried paintsticks before, but it looks like a lot of fun! I'm looking forward to learning more about them in your posts. Thanks.
ReplyDeleteIt IS a lot of fun! I hope you decide to try it.
DeleteI'm one of those with a great collection, of unopened paintstiks.
ReplyDeleteI had them for a while, too. AND I wasn't careful when I opened them and tracked metallic silver all over the house. More about that in the next post...
DeleteSome day I have got to try these paint sticks that have been hanging on my to do wall.
ReplyDeleteI think it's easier if there's a rubbing plate or a stencil or a paint color that is shouting your name.
DeleteI haven't used Shiva paint sticks yet. I have heard they are similar to oil pastels. Is that true?
ReplyDeleteHelen, I'm not sure. I've never used oil pastels on fabric. I've used them on paper and they are less gooey (is that a word?) than Paintstiks.
DeleteThanks for the tips on the reasons for curing. I would love to win the drawing.
ReplyDeleteThanks for the comment. Good luck!
DeleteI have about 3 paintsticks but have not had the courage to try anything with them - they seem kind of scary. Looking forward to trying them out on fabric.
ReplyDeleteBe not afraid! They're fun!
DeleteLike Theresa above, I haven't had the courage to get stuck in and try these yet!
ReplyDeleteHow silly is that when the results look so great.
Hadn't realised you had to wait a while for them to cure either
so thank you for that info.
My fingers are crossed : )
I'm so glad the info's helpful! Good luck to you!
DeleteThis is great concise information about Shiva Paintsticks. Thanks, Cyndi! I have never owned any, so would love to have the supplies you are offering and try it out.
ReplyDeleteDebbie, Thanks! I wish you luck!
DeleteLooking forward to reading more...I have some great stencils that I would like to use with my Paintstix, but I'm afraid of ruining them.
ReplyDeleteI have only used them on paper usually handmade paper where they pick up the texture. Will have to try on fabrics, need to find those stencils.
ReplyDeleteIt's about time that I knew how to use my collection of Shiva Paintsticks. Thanks.
ReplyDeletePaint sticks have been around for a while, and I don't own them so would love to try this oldie but goodie
ReplyDeleteThanks for the information about paint sticks. Now I'll be able to use the small set I own with alot more knowledge to have even more fun.
ReplyDeleteSOOO want to try this!
ReplyDeleteGlad I'm not alone - I have several but I haven't used them yet!
ReplyDeleteThanks for the inspiration!
Thanks for giving me a push to use the paint stick I have. I have been afraid to use it. The rubbing plates look awesome.
ReplyDeleteThanks for the great tutorial - it is very easy to follow, love the step by step with lots of pictures. You made it so easy to understand. Can't wait to try them!
ReplyDeleteI look forward to more information on using Paintstix. Thanks for the info.!
ReplyDeleteI bought the paintstix at a show six months ago. Not opened the box, so glad to read how much you like them.
ReplyDeleteThis takes the intimidation out of it - thank you!
ReplyDelete