Friday, February 26, 2016

Colour It Fuse It! - II

Let's get on with some fun stuff now! I showed you how to paint on the fusible web and interfacing.Here's some pictures of some other painted items:

This is one where I chose some colours based on the background fabrics.

Here's one where I painted the flowers onto the fusible. You can see in the quilt below that the transparency of the web adds interest to the quilt.


I also added fancy threads when I was fusing the painted web to the quilt. The stitching helps to keep the threads in place.


 Just to show how I placed the threads over and under the fusible before pressing them in place.

This one has lots of beads added, after the quilting.

Here's a couple of ideas for adding interest to your work as well, these work best on interfacing or stabilizer.

I've added some gold foil, stamping, and Thermofax printing!

Now here's a project that is quick and fun for you:
Gather up some of the pieces you've painted and cut them into strips. Add a few coordinating fabric strips as well.
Lay the strips over  a piece of fusible stabilizer (fusible side up) and weave the strips in and out. Pin the ends down and press the strips in place. Remember to use an applique pressing sheet or parchment paper.
Having the stabilizer underneath means that it will hold onto all the pieces!
Remove the pins and lay over a matching piece of fabric.
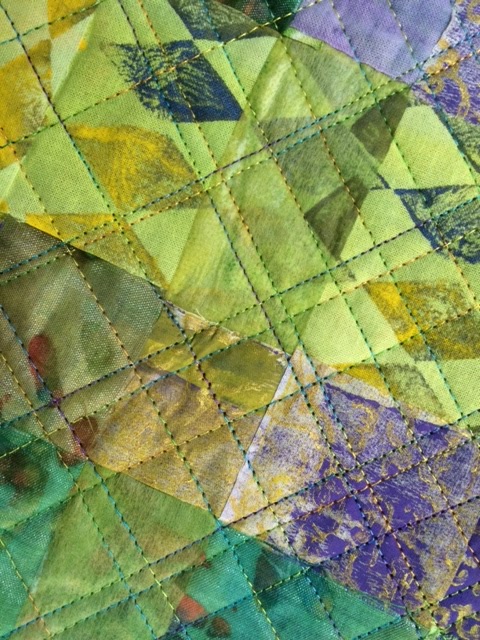
Stitch over top of the weaving to catch all the edges. I prefer a diagonal grid pattern, but you can choose any design you like.
Trim all the outside edges and zig zag stitch 2-3 times in a contrasting threads around all edges.

Fold over the edges to make an envelope, as shown in the photo, and stitch once more to secure.

Add a nice button and fancy thread to close the envelope.

Cute, isn't it! Easy too!
So here's the fun part, if you like these techniques I've shown you, why not leave a comment below and be part of the draw for my NEW DVD from Quilting Arts? On February 29th I'll draw a winner!
Be part of the fun and try out some of the great new ideas that I present! There's lots to choose from!

Now, if you're not a winner, there's another way to get your very own copy! You can go here and order one from Quilting Arts Store: http://www.interweavestore.com/fabric-embellishment-with-color-surface-design-and-more-dvd

Or just for you! I'm offering 10% discount for Printed Bee fans on the DVD in my Etsy shop:
http://tinyurl.com/hbvdpz2

I hope you had fun, I'd love to hear from you...sign up for my newsletter at www.susanpm.com

Sunday, February 7, 2016

Colour It, Fuse It!

Hi everyone and welcome to February! I'm the next person to introduce you to the wonderful world of colour, cloth and more....
This month we'll be working with applying paint and colour to a range of fusible web and interfacing products and doing some really strange and crazy things with them.


This is not your grandmothers fusible web! Join me while I show you how to combine paint, powders and foils with a variety of fusible webs and interfacings to create texture, layering and pattern.

Learn  ways to apply metallic foil for hints of sparkly shine or areas of glitz and glimmer. After cutting, tearing and ripping some of the pieces then time will be spent on building layers of interest with collage and stitch. 

Here are some supplies you will need: 

You will need:

·         2-3 fat quarters of fabric, light to medium value with texture or subtle print. Hand dyes or batiks work well. use these as colour inspirations for the background of your art piece.

·         one fat quarter muslin for backing

·         one  yard paper backed fusible web (NOT Heat and Bond), buy a couple different varieties if they are available

·         1/2 yard each of any variety of fusible and non fusible, woven or non woven interfacings and stabilizers. Try for different weights, maybe even different colours, some are available in black and beige. Avoid the nylon tricot ones.

·         plastic to cover your table

·         paper towels

·         three 1" bristle paint brushes

·         plastic cups for water

·         primary colours (red, blue, yellow) and black of Jacquard Dye-na-Flow™ or Setacolour Silk paints. The heavier textile paints can be thinned down for use as well.

 Now I have a short little video where you'll get to see me and I'll explain a little more about the supplies and you can see the painted effects. Don't pay attention to the workshop blurb at the end, as I have a surprise for you later on this month!


if the link doesn't open, just copy and paste into your browser